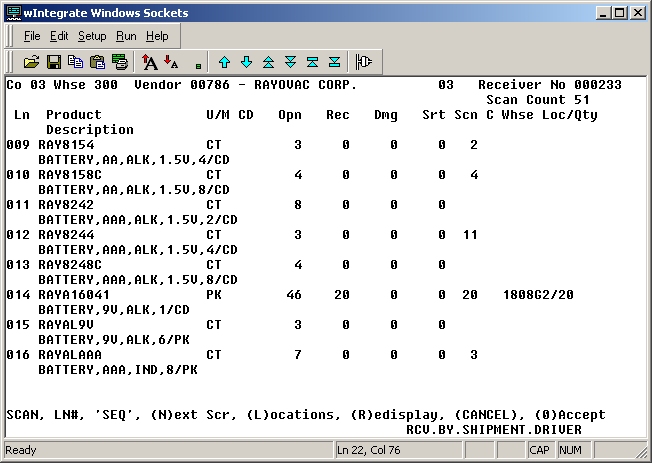
The Receiving Line Item screen shows all open quantities for all POs on the receiver. All quantities for the same item on multiple POs are accumulated on a single line on this screen.
To receive an item, you can scan its UPC bar code or enter each item manually by typing the UPC number at the command line of this screen. The number must have at least 5 characters to use the scanning option. To receive a large quantity without having to scan individually, enter the corresponding line number and manually enter the received quantity.
Different scenarios lead to errors in the receiving line item process. For example, let's say that the shipment includes a product that you did not actually order; the product is not on any of the POs associated with the receiver. In this example, an error occurs.
If an error occurs when you manually enter a line item on the Receiving Line Item screen, the system prompts you with an error message, enabling you to correct the error immediately. However, if an error occurs when you are scanning a product, the system system does not prompt you with an error message. Instead, the system adds the error to the Receive by Shipment Errors Report and allows you to continue scanning additional products uninterrupted. For information on correcting scanning errors, refer to Receive by Shipment Errors Report.
Note: It is easy to mistakenly scan a shrink-wrapped product's Each bar code instead of the intended Pack bar code. Therefore, if the UPC bar code that is scanned is valid but the unit of measure multiple associated with the UPC does not match the multiple on the PO, then the system displays a message to inform you about the mismatch in multiples. You have the option of rescanning the product or skipping it. This error is the only one that requires you to respond to a prompt before you can proceed with scanning.
Following is a list of fields and columns, as well as descriptions of each, shown on the Receiving Line Item screen.
Note: The order of the columns displayed on the Receiving Line Item screen is slightly different for pick-by-product warehouses compared to that of pick-by-order warehouses. The fields and columns listed below are presented in the order that they are displayed for a pick-by-product warehouse. For a pick-by-order warehouse, the C column is displayed after the Whse Loc column.
Scan Count: This is the total number of items scanned for this receiver; it is updated automatically whenever you scan an additional item. It includes any items that will be included on the Receive by Shipment Errors Report.
Ln: This is the line number of the line item. To change one or more fields for this line item, enter the corresponding line number at the command line.
Product Description: This is the product number and description.
U/M: This is the unit of measure in which you ordered the item.
CD: This is the type code for the item. The code identifies the stock status of the item. (blank = stock item, T = temporary item, N = non-stock item, S = special item)
Opn: This is the quantity that has yet to be received. When you change the quantity in the Rec, Dmg, or Srt columns, the Opn quantity is updated accordingly.
Rec: This is the quantity being received.
Dmg: This is the quantity of items that were received damaged. You can enter a description of the damage in the comment line.
Srt: If you are receiving the PO complete, but the shipment is short, enter the quantity by which the shipment is short.
Scn: This is the quantity that you scanned.
C: Entering Y in this column indicates that the line item has been received complete. A blank field or N in this column indicates that the line item remains open.
Whse Loc/Qty: This is the warehouse location where the quantity is normally stocked, as well as the received quantity that will be stocked there.
Following is a sample screen shot:
