Vision Supports Epicor Vista Data Integration
Back to Enhancement Details (list).
Back to Vision Supports Epicor Vista Data Integration (feature table).
|
Vision GUI Path
|
|
|
|
Vision Configuration —> System Configuration —> Dealer Information —> Software Gateways > Vista
|
|
|
|
Vision Configuration —> System Configuration —> Part Information —> Vista Data Load
|
|
Related Vision GUI Path
|
|
|
|
Vision Configuration —> Security Maintenance —> User Configuration —> [Selected User] > Roles
|
Overview
Software Gateway
|
Vision Configuration —> System Configuration —>
Dealer Information —> Software Gateways > Vista
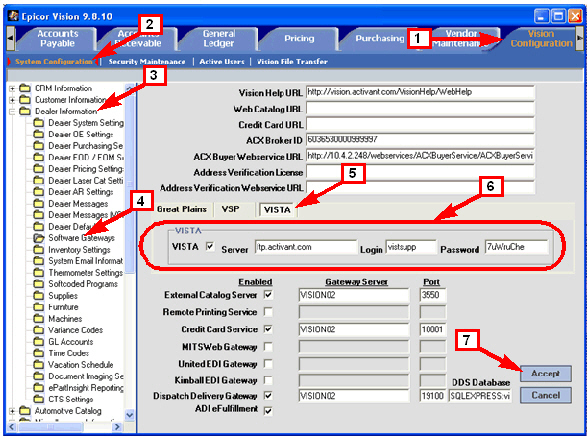
To configure the ftp software gateway you use for Vista data uploads, do the following:
1 Click Vision Configuration.
2 Click System Configuration.
3 Click Dealer Information.
4 Click Software Gateways.
5 Click Vista.
6 Fill out the required data.
VISTA — a check box to enable the gateway. Check it to enable; uncheck to disable.
Server — the server name of the gateway (for example, ftp.activant.com)
Login — the username for automatic login to the ftp server
Password — the password for automatic login to the ftp server
7 Click Accept.
|
|
Back to Overview | Back to Top
Enable Manufacturer Abbreviations
|
Vision Configuration —> System Configuration —>
Part Information —> Manufacturer Abbreviation —>
[Selected Manufacturer] : Allow Vista Add
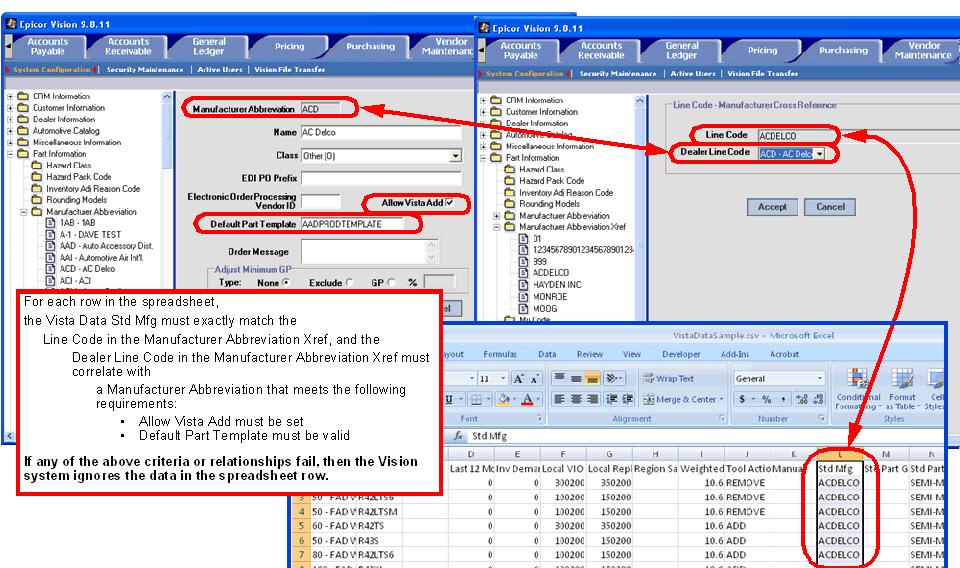
Each manufacturer that you want to be able to use Vista data, must be specifically enabled for Vista data. You enable a manufacturer for Vista data by setting the Allow Vista Add check box and specifying the Default Part Template on the Manufacturer Abbreviation screen.
1 Click Vision Configuration.
2 Click System Configuration.
3 Click Part Information.
4 Click Manufacturer Abbreviation.
5 Select a manufacturer.
For example, ACD - ACDelco.
Note: The manufacturer must have a Manufacturer Abbreviation Xref that associates the manufacturer with the Std Mfg column in the Vista data. See:
• Set Up Manufacturer Abbreviation Xref.
• Mfg Abbr - Mfg Abbr Xref - Vista Data Example
Please see below right if you need to
Add a New Abbreviation.
6 Set Allow Vista Add.
7 Type the Default Part Template.
For example, AADPRODTEMPLATE.
8 Click Accept.
9 Repeat step 5 through step 8 for each manufacturer you want to enable for Vista data.
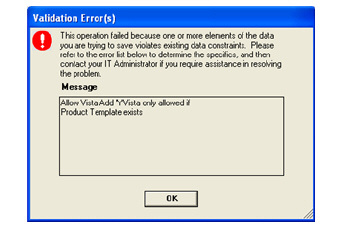
Note: if there is no Default Part Template (the field circled in red), the system does not allow you to set the Allow Vista Add check box. If you attempt to do so, when you click Accept the system presents a Validation Error as shown at below right. For more information, please see Vision Data Updates.
|
|
|
Add a New Manufacturer Abbreviation
Sometimes, you may want or need to create a new manufacturer abbreviation to accommodate your Vista data needs (for example, if the Vista data includes a manufacturer new to your database). If this is the case, follow this procedure instead
of step 5.
|
1 Right-click anywhere under the Manufacturer Abbreviation folder.
2 From the pop-up menu, choose
Add New Manufacturer Abbreviation.
3 Fill in the fields appropriately.
4 Continue with step 6 in the main procedure.
|
|
Validation Error
The system displays this error if the Default Part Template field is empty and you tried to set the Allow Vista Add check box.
For Information on how to create and assign a default product template, please see Product Template Associated with Manufacturer.
|
|
Back to Overview | Back to Top
Set Up Manufacturer Abbreviation Xref
|
Vision Configuration —> System Configuration —>
Part Information —>
Manufacturer Abbreviation Xref—>
[Selected Manufacturer]
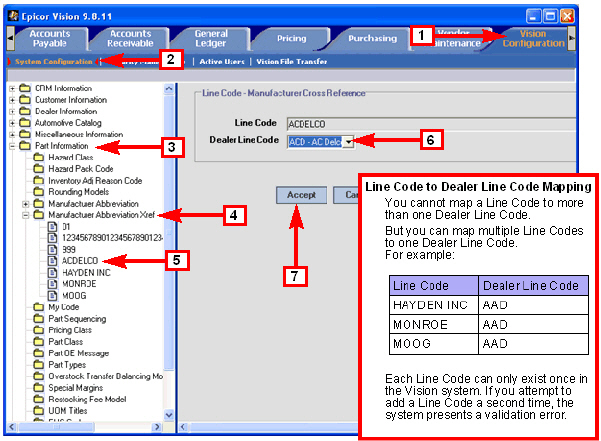
Each manufacturer for which you want to import Vista Data must have a Manufacturer Abbreviation Xref that associates the Std Mfg column in the Vista Data with a Manufacturer in your database.
1 Click Vision Configuration.
2 Click System Configuration.
3 Click Part Information.
4 Click Manufacturer Abbreviation Xref.
5 Select a Manufacturer Abbreviation Xref.
For example, ACDELCO.
Note: The Line Code must be the name of the manufacturer as it appears in the Std Mfg column of the Vista Data. (The software uses only the first 50 characters of this field.) If there is no manufacturer line code that exactly matches the Std Mfg column, the data in that row will be ignored. See Std Mfg, column L in Vista Data Spreadsheet Fields. See also:
• Enable Manufacturer Abbreviations.
• Mfg Abbr - Mfg Abbr Xref - Vista Data Example
If you need to Add a New Manufacturer Abbreviation Xref,
please see below right.
6 Select a Dealer Line Code from the drop-down list.
Note: The Dealer Line Code is the Manufacturer Abbreviation used on your product records. It must be a manufacturer abbreviation where you have set Allow Vista Data (see Enable Manufacturer Abbreviations).
7 Click Accept.
8 Repeat step 5 through step 7 for each manufacturer abbreviation xref you need to set up.
Back to Overview | Back to Top
|
|
|
Add a New Manufacturer Abbreviation Xref
Sometimes, you may want or need to create a new manufacturer abbreviation cross reference to accommodate your Vista data needs (for example, if the Vista data includes a manufacturer new to your database). If this is the case, follow this procedure instead of step 5.
|
1 Right-click directly under the Manufacturer Abbreviation Xref folder.
2 From the pop-up menu, choose
Add New Manufacturer Abbreviation Xref
3 Fill in the fields appropriately. See the notes under step 5 and step 6 to the left.
4 Continue with step 7 in the main procedure.
|
Enable Users
|
Vision Configuration —> Security Maintenance —>
User Configuration —> User Maintenance —>
[Selected User] > Roles
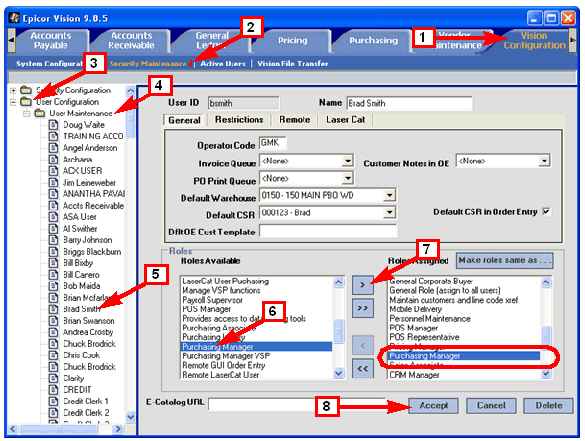
Each user that you want to be able to upload the Vista data must have the FILE MAINTENANCE VISTA job function. Without this job function, a user cannot run the Vista Data Load utility.
The FILE MAINTENANCE VISTA job function is built into these two standard roles:
• Purchasing Manager
• Purchasing Associate
You can assign the job function to your custom roles as needed.
To enable a user through one of the standard roles, do the following:
1 Click Vision Configuration.
2 Click Security Maintenance.
3 Click User Configuration.
4 Click User Maintenance.
5 Select a user.
For example, Brad Smith.
6 Select the role you wish to assign from the Roles Available list.
For example, Purchasing Manager.
7 Click the right arrow.
The Purchasing Manager role moves to the Roles Assigned list.
8 Click Accept.
9 Repeat step 5 through step 8 for each user you want to have the ability to load Vista data.
|
|
Back to Overview | Back to Top
Mfg Abbr - Mfg Abbr Xref - Vista Data
Back to Overview | Back to Top
Load Vista Data
|
Vision Configuration —> System Configuration —>
Part Information —> Vista Data Load
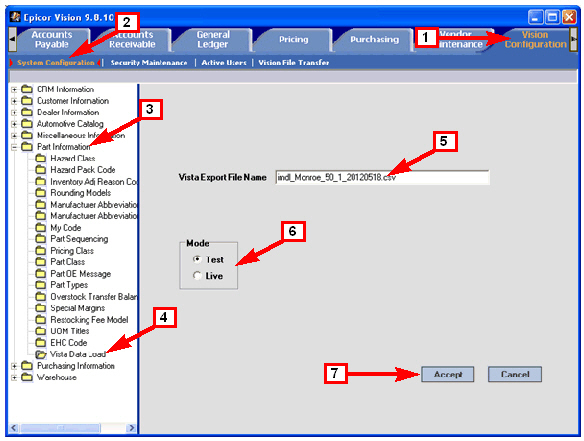
You load the Vista data through a screen in the Part Information folder under the Vision Configuration tab. Before you use the following procedure, you must first configure your system to use Vista data. Please ensure you have completed the steps under Configuration.
1 Click Vision Configuration.
2 Click System Configuration.
3 Click Part Information.
4 Click Vista Data Load.
5 Type the Vista Export File Name.
This is the name of the csv file (comma separated values) containing the Vista data that you want to import.
For example, imdl_Monroe_50_1_20120518.csv.
Note: This must be the full filename for the csv file; NOT the title of the Vista data model. Also, the file must already exist in the CONV.WORK folder (directory). For instructions on how to put a file into the CONV.WORK directory, please see Copy a .CSV File to the Vision Server.
6 Select the Mode.
Test — Generates a report showing the changes that would be made to the Vision part database if Vista Data Load were run in Live mode.
Live — Makes actual changes to the Vision part database and generates a report showing the major changes..
See example reports under Vista Load Reports.
7 Click Accept.
After upload, you can view the new data on two new GUI screens as shown under Vista Part Data GUI Display.
|
Note: The file name is always of the form imdl_XXX_YYYYMMDD.csv the XXX portion represents the Vista data model and YYYYMMDD being the date. In the example used in the screenshot, imdl_Monroe_50_1_20120518.csv, Monroe_50_1 is the Vista data model, while 20120518 repersents May 18, 2012.
Note: Multiple data models in Vista can reference the same manufacturer and part. The last import always overwrites the previous import.
|
Back to Overview | Back to Top
Vista Data Spreadsheet Fields
The following tables represent the spreadsheet for uploading Vista data. These fields have been added to the Vision database. Where the fields are the same as existing Vision database fields, the relevant Vision database is mentioned. For example, Part (column B) is the same as Product Master, External Product.
Note: In order for each row of data to be stored in the correct part record, the value in Std Mfg (column L) must be associated with a Vision Manufacturer Abbreviation through the Manufacturer Abbreviation Xref.
Please see Set Up Manufacturer Abbreviation Xref.
|
Column
|
A
|
B
|
C
|
D
|
E
|
F
|
G
|
H
|
I
|
J
|
K
|
|
Column Name
|
Location
|
Part
|
Stocked
|
Last 12 Mo Sales
|
Inv Demand YTD+LY
|
Local VIO
|
Local Replace
|
Region Sales
|
Weighted Coverage
|
Tool Action
|
Manual
|
|
Comment
|
Warehouse
|
Product Master
EX_PROD
|
Product Detail
|
New
|
New
|
New
|
New
|
New
|
New
|
New
|
New
|
|
Field Size
|
|
|
|
10R
|
10R
|
10R
|
10R
|
10R
|
10R
|
|
|
|
Column
|
L
|
M
|
N
|
O
|
P
|
Q
|
R
|
S
|
T
|
U
|
V
|
|
Column Name
|
Std Mfg
|
Std Part Group
|
Std Part Type
|
Std Part Description
|
Sub Brand
|
Grade / Material
|
Superseded Flag
|
Manufacturer Pop Code
|
Import / Domestic
|
Vehicle Family
|
Prominent Make
|
|
Comment
|
New
See Note: above.
|
New
|
New
|
Product Master
DESC_1 DESC_2
|
New
|
New
|
New
|
New
|
New
|
New
|
New
|
|
Field Size
|
|
20L
|
20L
|
|
20L
|
20L
|
1L
|
1L
|
10L
|
15L
|
15L
|
|
Column
|
W
|
X
|
Y
|
Z
|
AA
|
AB
|
AC
|
AD
|
|
Column Name
|
Make List
|
Prominent Model
|
Model List
|
Min Model Year
|
Max Model Year
|
Per Car Qty (max)
|
Lost Sales
|
Inventory Age
|
|
Comment
|
New
|
New
|
New
|
New
|
New
|
Product Master Per_CAR_QTY
|
New
|
New
|
|
Field Size
|
|
20L
|
|
4R
|
4R
|
|
10R
|
20L
|
Note: The Make List and Model List columns are left empty in the database.
The columns must be present in the spreadsheet for upload but can be empty.
Back to Overview | Back to Top
Vision Data Updates
|
This section explains the rules that govern how the Vision system uses the Vista data spreadsheet to update the Vision product database.
When you upload a Vista data spreadsheet in Test Mode, the system makes no changes to the product database. It only generates a report that shows what changes would be made in Live Mode.
When you upload a Vista data spreadsheet in Live Mode, the system applies a set of requirements to each row to determine whether to update the Vision product database with the information in the row.
If the requirements at right are met, then the spreadsheet columns described next control how the Vision system updates the product databases.
|
|
Update Requirements
• The Vista data spreadsheet must be loaded in Live Mode.
If the spreadsheet was loaded in Test mode, the system makes no changes to the database.
• The value in the Std Mfg column of the Vista data spreadsheet must be cross-referenced to a valid Vision Manufacturer Abbreviation. If it is not cross-referenced, the system ignores the row.
Please see Set Up Manufacturer Abbreviation Xref.
• The valid Vision Manufacturer Abbreviation must have its
Allow Vista Add check box set. If it is not set, the system ignores the row.
• In order for the valid Vision Manufacturer Abbreviation to have its Allow Vista Add check box set, it must have a valid Default Part Template.
|
Spreadsheet Control Column Definitions
|
Column
|
Name
|
Value
|
Comment
|
|
L
|
Std Mfg
|
Free form Text
|
Manufacturer as defined by Vista. The value in this column must be cross referenced to a Vision Manufacturer Abbreviation through the Manufacturer Abbreviation Xref as described here.
The cross-referenced manufacturer abbreviation is the dealer line code under which the product will be created if it is being added to the product database.
If the value does not have a valid cross-reference, then the row is ignored regardless of the value of other fields in the row.
|
|
J
|
Tool Action
|
ADD
KEEP
REMOVE
|
Action to take on the product. See next table below.
|
|
K
|
Manual
|
ADD
KEEP
REMOVE
|
Note1: Not usually used. If NOT NULL, then it is used instead of Tool Action.
|
Database Actions Per Spreadsheet Control
|
Std Mfg
|
Tool Action
|
Manual
|
Result
|
|
cross referenced to a valid mfg
|
ADD
|
Note1
|
The system creates a new Stock product with the cross-referenced manufacturer abbreviation. The system adds the part using the Default Part Template set up for the manufacturer abbreviation.
An existing Non-Stock product, becomes a Stock product.
Note: Temporary and Special Item stocking indicators remain unchanged.
|
|
cross referenced to a valid mfg
|
REMOVE
|
Note1
|
The system changes the product to a non-stock product.
The system also removes Reorder Quantity, Reorder Point, and Line Point for the product.
Note: Temporary and Special Item stocking indicators remain unchanged.
|
|
NOT cross referenced to a valid mfg
|
|
|
The system assumes the product is not on file and skips that row in the spreadsheet.
|
Note: The Vision system sends to Compass all Vista data spreadsheet fields that result in an update to the Vision product databse.
Back to Overview | Back to Top
ROP Calculation
|
Purchasing —> ROP Model —> [Selected Model] —>
[Selected Rule] —> Change Calculation Data >
Stocking Minimums :
• VIO Min factor to stock 1 unit
• Local Demand Min factor to stock 1 unit
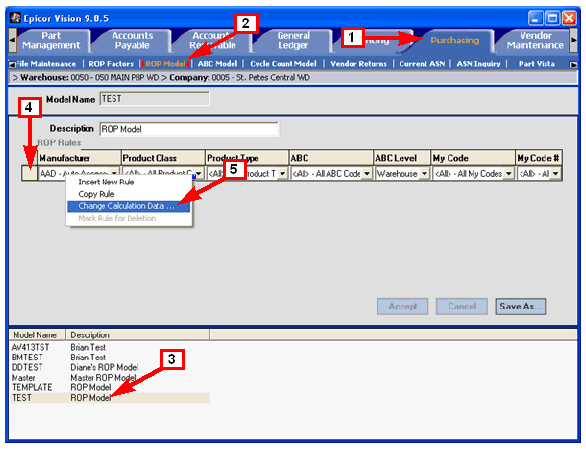
These two parameters from the Vista data (see path above) have been added to the ROP Model Calculation interface.
Note: VIO = Vehicles in Operation.
1 Click Purchasing.
2 Click ROP Model.
3 Click on the model you want to work with.
For example, TEST.
4 Right-click the button at the beginning of the rule you want to work with.
5 Select Change Calculation Data from the popup menu.
The system displays the
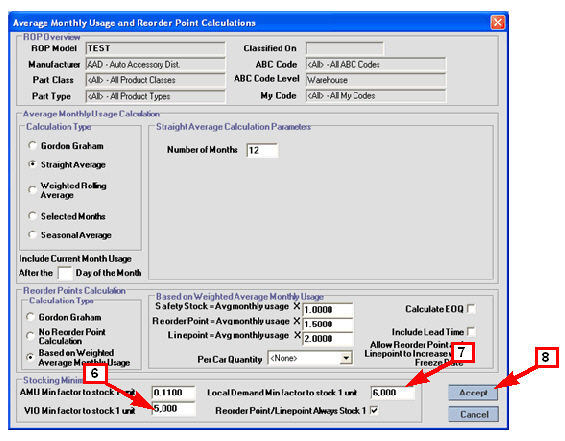
Average Monthly Usage and Reorder Point Calculation dialog as shown below right.
|
|
|
6 Type the factor to use for
VIO Min factor to stock 1 unit.
Note: The VIO Min factor to stock 1 unit
must be an integer.
7 Type the factor to use for
Local Demand Min factor to stock 1 unit.
Note: The Local Demand Min factor to stock 1 unit
must be an integer.
8 Click Accept.
Note: For more information, see these sections:
• VIO Min factor to stock 1 unit
• Local Demand Min factor to stock 1 unit
|
|
Back to Overview | Back to Top
Vista ROP parameters
|
VIO Min factor to stock 1 unit
The system compares the Local VIO quantity on the part record to see if it is greater than or equal to the VIO Min factor to stock 1 unit quantity in the ROP calculation parameters. The system also considers the Per Car Quantity when deciding whether to stock a unit.
More precisely speaking, it works this way:
|
|
Local Demand Min factor to stock 1 unit
The system compares the local demand to the Local Demand Min factor to stock 1 unit in the ROP calculation parameters and determines whether a unit should be stocked.
More precisely speaking, it works this way:
|
|
IF the Reorder Point is less than 1
AND the Local VIO quantity on the part record is greater than or equal to the VIO Min factor to stock 1 unit quantity in the ROP calculation parameters,
THEN stock at least one unit
(or more according to the Per Car Quantity).
|
|
IF the Reorder Point is less than 1
AND the Local Demand Min factor to stock 1 unit in the ROP calculation parameters has a value (it is not Null)
THEN IF Vista Local Demand is greater than the
Local Demand Min factor to stock 1 unit
THEN set the Reorder Point to 1.
|
|
For those who like a more programmatic presentation, the effect of
VIO Min factor to stock 1 unit can also be represented by this pseudo
code:
IF Reorder Point < 1
AND Vista Local VIO >= VIO Min factor to stock 1 unit
THEN stock at least (1 or Per Car Quantity)
|
|
For those who like a more programmatic presentation, the effect of
Local Demand Min factor to stock 1 unit can also be represented by
this pseudo code:
IF Reorder Point < 1
AND Local Demand Min factor to stock 1 unit <> Null
THEN IF
Vista Local Demand > Local Demand Min factor to stock 1 unit
THEN set the Reorder Point to 1
|
|
|
|
Note: Vista Local Demand = Inv Demand YTD+LY
(from spreadsheet, column E) =
Demand This/ Last Year (from GUI screen display).
|
Back to Overview | Back to Top
Vista Part Data GUI Display
Once you have completed a Live Mode upload of the Vista data, you can see the Vista data on a part-by-part basis on these two view-only screens:
• Part Management —> Part Vista
• Purchasing —> Part Vista
|
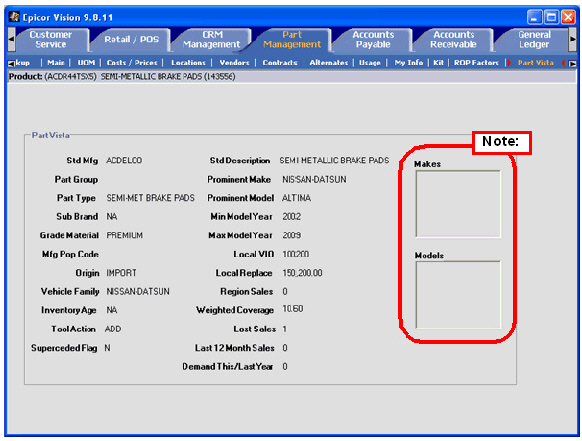
Part Management —> Part Vista
To see the Vista part data, do the following:
1 Click Part Management.
2 Click Part Lookup and search for a part as usual (not shown).
3 Click Part Vista.
The Vision system displays the Vista data for the part.
Note: Makes and Models are for future use. The columns exist in the spreadsheet but any data is not displayed in the user interface.
|
|
Back to Overview | Back to Top
|
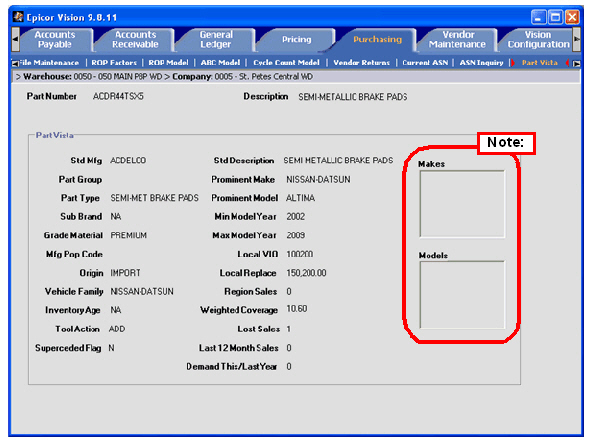
Purchasing —> Part Vista
To see the Vista part data, do the following:
1 Click Purchasing.
2 Click Part and search for a part as usual (not shown).
3 Click Part Vista.
The Vision system displays the Vista data for the part.
Note: Makes and Models are for future use. The columns exist in the spreadsheet but any data you may include in the spreadsheet is not displayed in the user interface.
|
|
Back to Overview | Back to Top
Vista Load Reports
|
When you upload a Vista Data spreadsheet, in either Live Mode or Test Mode, Vision generates a report and puts it in your spooler. From your spooler, you can view it or print it for further study.
The report provides a list of parts by warehouse that includes the part number and the description for products that were changed (Live Mode) or would be changed (Test Mode) by the load process. The report heading includes the date and time and which mode it was run in.
|
|
The report groups products in three sections for each warehouse. Here are the section headings:
• New Parts Added
• Items Changed from Non-Stock to Stock
• Items Changed from Stock to Non-Stock
Note: If there is no change to an item, then the system does not print a line in the report for that item. For example, the spreadsheet may include a row for a stock item with the Tool Action = ADD. This would equate to no change for the part, so therefore, it is not included in the report.
|
|
Examples of the report are here:
• Vista Test Mode Report Example
• Vista Live Mode Report Example
|
Back to Overview | Back to Top
Vista Test Mode Report Example
Back to Overview | Back to Top
Vista Live Mode Report Example
Back to Overview | Back to Top