|
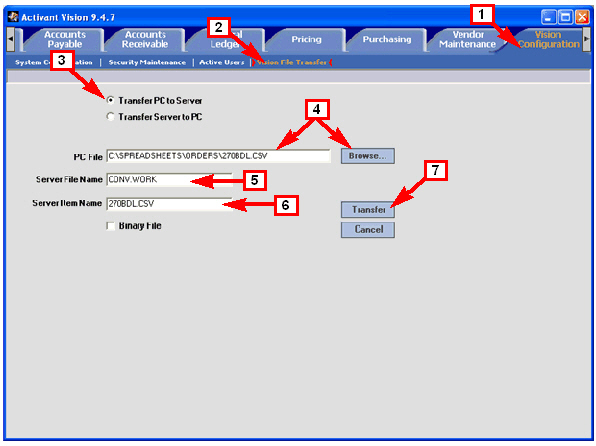
1 Click Vision Configuration. 2 Click Vision File Transfer. 3 Click Transfer PC to Server. 4 Input the PC file name and path. Either type the file path and file name: C:\SPREADSHEETS\ORDERS\270BDL.CSV Or click Browse to select the file. Note: Although this example uses a .CSV file, any file type can be transferred. If the file type is not some form of text file, you should set the Binary File check box. 5 Input the Server Filename: CONV.WORK. Note: CONV.WORK is a special directory (or folder) on the Vision server. You must use this directory as the destination even if you copy the file to the Vision server manually. 6 Type the Server Item Name. You can use the same name that you input for the PC file name. However, you must leave out the file path information. For example, 270BDL.CSV. Note: While it is not always necessary to use the same filename or the extension, it is advised that you do so. Using the same filename and extension simply makes it easier to track back what was done if you run into trouble. In any case, you will need to remember the filename you give it in order to use the file in any of the Vision options in either the Vision Back Office or the Vision GUI. 7 Click Transfer.
|
Tip: You may find it useful to create a standard filename format for all the files you transfer. For example, the vendor or customer number combined with the date can create a unique identifier to help you correlate uploaded files with resultant purchase orders or customer orders or other things you generate from the uploaded files. |
 Use the browser’s Back button to return to the previous page in the online help.