Setting up Dispatch and Delivery System (DDS)
Activant's Dispatch and Delivery System (DDS) lets you track the delivery stages of all orders, select the most suitable warehouse and driver, and receive daily reports on delivered orders.
You must complete four major tasks in order to enable DDS. Click the links to scroll down to procedures on performing these tasks.
-
Enable DDS for each map location (immediately below)
-
Enter DDS gateway interface settings.
-
Specify a new DDS rank for each location in Customer Maintenance.
-
Assign personnel to the CRM event DDSError to monitor DDS events. For more information on configuring CRM events, see Set the Basic Parameters for a CRM Event.
-
Updates to DDS may occur while you are resolving DDS errors. The system will hold these updates until you run the manual recovery procedure. To run the procedure, log into Vision Back Office and run PRECOVER.DDS.ITEM at the ECL prompt. As the system processes each update, any CRM events caused by the held updates will be cleared automatically.
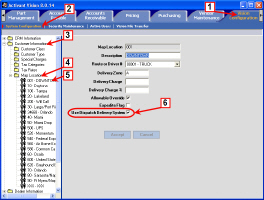
1. Enable DDS for each Map Location
To enable DDS to be able to access a Vision map location, do the following:
-
Click the Vision Configuration tab.
-
Click System Configuration.
-
Open the Customer Information folder.
-
Open the Map Location folder.
-
Click the location you want to enable for DDS.
-
Set the Use Dispatch Delivery System check box.
|
Click the images to see a larger view.
|
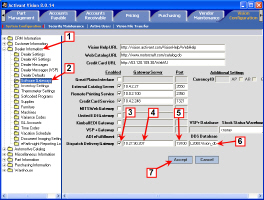
2. Enter DDS Gateway Interface Settings
To enable Vision to interface with DDS, do the following:
-
Open the Dealer Information folder.
-
Open the Software Gateways folder.
-
Set the Dispatch Delivery Gateway check box.
-
Type the IP address for the DDS gateway server.
-
Type the port for the DDS gateway server.
-
Type the name of the DDS database.
-
Click Accept.
|
Click the images to see a larger view.
|
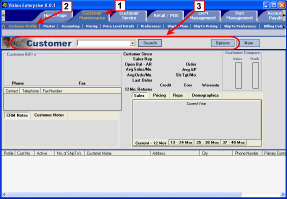
3. Specify a DDS Rank for Each Customer Location
To specify a DDS rank for each location, do the following:
-
Click the Customer Maintenance tab.
-
Click Customer Profile.
-
Select a customer.
Click here to learn how to search for and select a customer. Vision will display the customer in each Customer Maintenance screens you click.
|
Click the image to see a larger view.
|
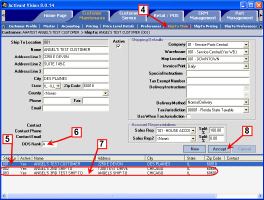
-
Click Ship to Main.
-
Click a Ship To location from the table at the bottom of the screen.
-
Enter the appropriate DDS Rank.
The rank must be a single letter, A
–
Z. This is a priority level that you can use for sorting searches.
-
Repeat Steps 5 and 6 for the rest of the Ship To locations.
-
Click Accept.
-
Make sure you assign personnel to the CRM event DDSError to monitor DDS events, as mentioned at the beginning of this page.
|
Click the image to see a larger view.
|