This page contains instructions on the following:
Installing wIntegrate
Proxy
-
Click the
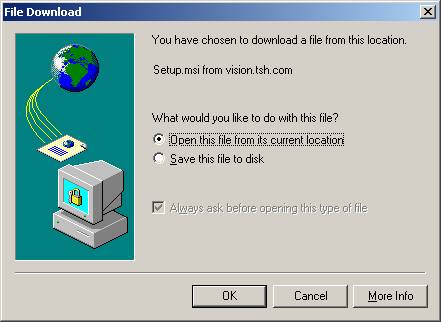
wIntegrate Proxy link. The File Download dialog box appears.
-
Select Open this file from its current location and click OK.
-
The wIntegrate Proxy
dialog box appears. Click Next.
-
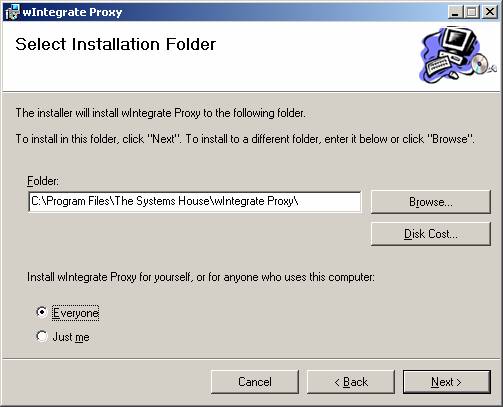
On the Select Installation Folder
dialog box, select the location where the files should be stored. Also
select the Everyone option so that wIntegrate Proxy will be installed for
anyone who uses your computer.
(If you would like to
change the location where you store the file on your PC, click Browse
and select the appropriate location.)
-
Click Next to continue.
-
Click Next again to install the
program.
-
After the installation is
complete, click Close to exit the Installation Wizard.
top
Starting
wIntegrate Proxy
Once wIntegrate Proxy has been
installed, you can start it.
-
On your Windows taskbar, click the
Start button, and then point to Programs. Point to The Systems
House, and then click wIntegrate Proxy. wIntegrate Proxy is started, and the
Secure wIntegrate Proxy image ( )
appears in the lower right corner of your desktop.
)
appears in the lower right corner of your desktop.
-
If it is the first time you are using wIntegrate
Proxy, you may need to set up the the proxy connection properties. To
do this:
-
Right-click the Secure wIntegrate Proxy
image ()
and select Connection Properties.
-
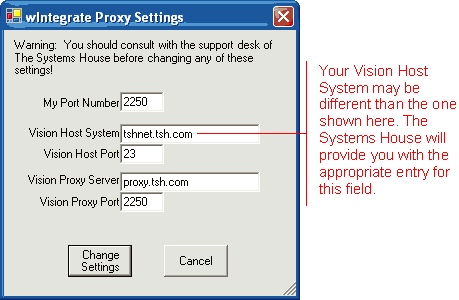
The wIntegrate Proxy Settings
dialog box appears. Fill in the fields as shown below. Note that your
implementations specialist at The Systems House can provide you with the
appropriate information for the Vision Host System field.
-
Click the Change Settings button.
Note that every time you reboot
your PC, you need to restart the wIntegrate Proxy program. If you'd like, you
can add the wIntegrate Proxy to your list of Startup programs so that wIntegrate
Proxy is started automatically every time you reboot:
-
Click the Start button, and
then point to Programs. Then point to The Systems House.
-
Click wIntegrate Proxy and drag it to
the folder on the Startup menu.
-
Once the program is on the Startup
menu, it will run every time you reboot or turn on your PC.
top
Setting up
your wIntegrate Session
Once you have wIntegrate Proxy
running, you can set up your wIntegrate session.
-
Start wIntegrate.
-
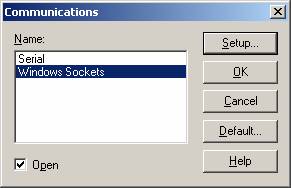
On the Setup menu, click Communications. The Communications dialog box
appears.
-
Select Windows Sockets and
click Setup. The Windows Sockets Communications
dialog box appears.
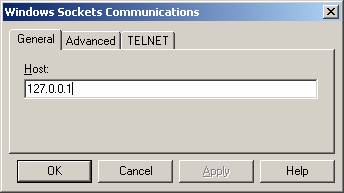
-
On the General tab, in the Host field,
type 127.0.0.1.
-
Click the Advanced tab.
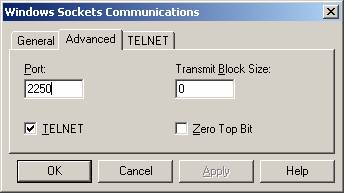
-
In the
Port field, type 2250.
-
Click OK.
-
The Communications dialog box
appears again. Click OK.
-
On the Setup menu, click Terminal. The Terminal dialog box appears.
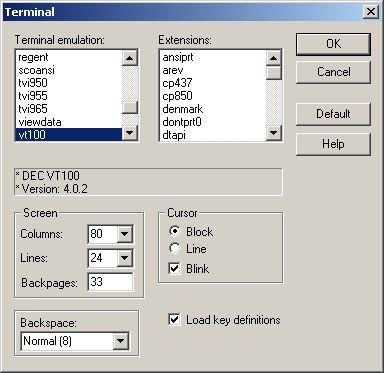
-
In
the Terminal emulation list, select vt100.
-
Click OK.
-
If you would like, you can change the
text that appears in the title bar of this wIntegrate session:
-
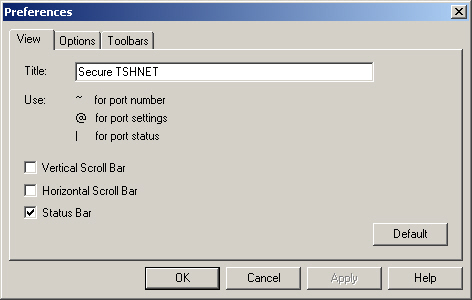
On the Setup menu, click Preferences.
-
The Preferences screen appears.
On the View tab, in the Title field, type Secure TSHNET or
whatever you'd like to appear in the title bar.
-
Click OK.
- On the File menu, click Save As.
- In the File name field, type a name and then click Save.
- Your session to connect to TSHNET is
now set up. You are now ready to use Secure wIntegrate to access your account on
TSHNET. Enter your TSHNET user name and password to log on to the system.
top