Mark Receiver Voucher Complete
Back to Mark Receiver Voucher Complete (feature table).
These are the paths associated with marking vouchers as complete or not complete.
|
Vision GUI Path
|
|
|
|
|
|
|
Accounts Payable —> Receivers
|
|
|
|
Vision Back Office Menu Path
|
|
|
|
|
Auto
|
2.16.3.4
|
Inventory Receipts Not Vouchered Report
|
|
|
|
|
14.4.10
14.4.11
|
POs Received Not Vouchered Report
POs Vouchered Not Received Report
|
|
|
|
|
12.6.5.1.15
|
PO Receiver Records (INV_RCPT)
|
This is a purge function.
|
|
|
|
OP
|
3.13
|
Unvouchered Inventory Receipts Report
|
|
|
|
|
|
3.11
3.12
|
PO's Received Not Vouchered Report
PO's Vouchered Not Received Report
|
|
|
|
|
|
28.1.12
|
Purge Shipment Receiver Records (INV_RCPT)
|
This is a purge function.
|
|
Links to Main Topics in this Discussion
Overview
Mark Vouchers Complete or Not Complete
Conditions for Changing Status
Overview
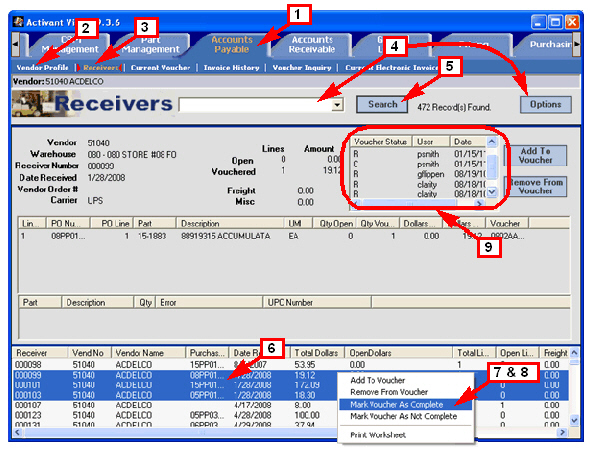
Vision provides the ability to mark receiver vouchers as complete or not complete, independent of any other process. On the Accounts Payable —> Receivers screen, you can now right-click on an item in the list view and choose either of two new options:
• Mark Voucher As Complete
• Mark Voucher As Not Complete
This function allows you to handle vouchers that for various reasons will never be marked as complete in the normal course of events.
Note: Once vouchers have been marked complete, you can purge them from your system by using the appropriate purge function listed in the table above.
The Receiver screen also has a Voucher Status history display to the right of the vendor information. This history displays the status code of Complete or Remove Complete, the user who made the change, and the date the user made the change.
Previous to release 9.3, the main list view on the Accounts Payable —> Receivers screen did not display the warehouse and the voucher status. These two columns are now displayed at the far right of the main list view.
Back to Top.
Mark Vouchers Complete or Not Complete
|
To mark voucher as complete or not complete, do the following:
1 Click Accounts Payable.
2 Click Vendor Profile and select a vendor.
3 Click Receivers.
4 Set search parameters.
5 Click Search.
6 Select one or more vouchers.
7 Right-click the selected voucher(s).
The popup menu appears.
8 Select from the following:
• Mark Voucher As Complete
• Mark Voucher As Not Complete
Note: When you change the status of
vouchers, certain conditions must be met. Otherwise, Vision displays a validation error and no changes are made.
Please see Conditions for Changing Status
9 View the changes in the Voucher Status list view. Please see Voucher Status Column description at right.
Note: The Voucher Status list view can display the history of only one voucher at a time. The top-most selected voucher in the main list view will be the one whose history is displayed in the Voucher Status list view.
Back to Top.
|
Voucher Status Column: The Voucher Status column in the main list view displays a status of C when the voucher is complete or marked as complete. When the voucher is not complete, the Voucher Status column in the main list view is blank.
However, the Voucher Status history list view displays the history of changes to the voucher status. That is, the status column displays C if the voucher has been marked complete and R if the voucher has been marked as not complete after having once previously been marked as complete. In other words, the R (for Remove) indicates that a previous status of Complete has been removed. The history list view displays the Voucher Status, the User who changed the status, and the Date the status changed.
|
Conditions for Changing Status
|
When you make changes in the status of a voucher, Vision applies validation criteria to help prevent accidental (unintended) status changes. This is especially important because you can select non-contiguous vouchers in the list view and some selected vouchers may therefore not be visible in the list view when you select others (for example, by using a control-click).
To avoid validation errors, the following conditions must be met:
• Selected vouchers must all have the same current status.
• Selected vouchers must have a current status different than the change selected from the popup menu.
If the selected vouchers do not meet the above criteria, Vision displays a validation error and makes no changes.
Back to Top.
|