Consignment
/ Dealer Inventory
Back to Consignment / Dealer Inventory (feature
table).
These are the paths you will use to implement
Consignment/Dealer Inventory.
Vision
GUI Path |
|
|
|
|
Vendor
Maintenance —>Master > Status : Consignment Vendor
Customer Maintenance —> Ship
To Preferences > PO Requirements : Consignment Vendor
Vision Configuration —> System
Configuration —> Dealer Information —> GL Accounts : Consignment
Inventory.
Vision Configuration —> System
Configuration —> Dealer Information —>Variance Codes : Consignment
Inventory
Vision Configuration —> System
Configuration —> Dealer Information —> Dealer Defaults
> Consignment Inventory : GL Variance Code
Select the “Consignment Inventory”
variance code.
Customer Maintenance —> Consignment/Dealer
Inv
Purchasing —> Current PO
Customer Service —> Current Order
Customer Service —> Part (F5) |
Vision Back Office
Menu Path |
|
|
Auto |
3.9.1 |
Inventory Report |
|
|
|
3.9.2 |
Inventory Count Sheet |
|
|
OP |
8.9.1 |
Inventory Report |
|
|
|
8.9.2 |
Count
Sheet. |
|
Links to Main Topics in this Discussion
Overview
Consignment Inventory is inventory that you own
but which you have shipped to be stored at your customer’s facility (either
a store or a warehouse). You bill your customer for the inventory only
after it is sold. Essentially, the Consignment Inventory feature lets
your customer sell directly from your stock.
Vision provides the means for you to do the following
essential functions:
• Track
and report on dealer and consignment inventory, including two (2) years
of consignment sales history by company, customer, ship-to, and part.
• Enter
stock quantities for dealer and consignment inventory.
• Set
up a consignment relationship with a specified customer.
• See
what part quantities are on consignment when creating an order.
How It Works
You set up a “Consignment Vendor” for each customer’s
Ship-To that will receive consignment inventory. There must be a unique
consignment vendor for each Ship-To as this is part of the tracking and
reporting mechanism. Then, in order to ship parts to the customer, you
use a negative purchase order (a return). The return reduces the part’s
quantity on hand by the quantity of the consignment parts. When you receive
the purchase order, Vision updates the consignment inventory record for
the part. During End Of Day processing, the system vouchers the negative
purchase order at zero dollars, using a Consignment Inventory general
ledger account. The quantity of consigned parts is displayed on the Part
(F5) screen under the Part Info subtab (under both Customer Service and
Retail/POS).
Note: EOD
automatically knows to voucher the negative purchase order at zero dollars
because the PO is for a consignment vendor.
Periodically, you take a physical count of the
consignment inventory, using a Consignment Count Sheet. Based upon the
physical count, the consignment inventory is replenished through the “Consignment
Vendor” by means of another return purchase order and the parts that were
sold are billed via an order.
Back to Top.
System Configuration
Follow these procedures to configure your
system for handling consignment inventory. These procedures help you set
up your GL Account rules and variance codes for handling the negative
purchase orders you use to put parts on consignment with a specific customer.
• Set Up New
GL Account Rules
• Set Up a Consignment
Variance Code
• Set the
Dealer Consignment Inventory Variance Code
Back to Top.
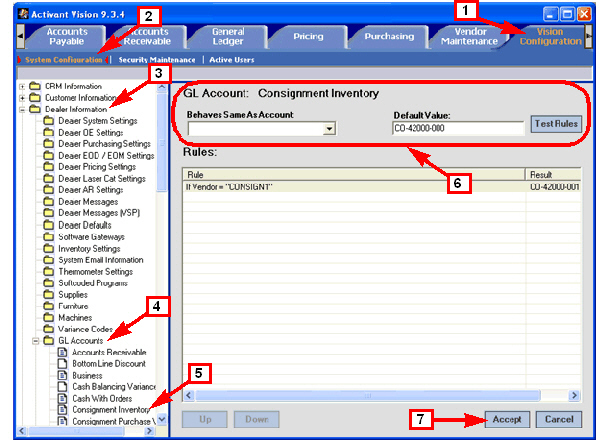
Set Up New GL Account
Rules
1 Click
Vision Configuration.
2 Click
System Configuration.
3 Open
the Dealer Information folder.
4 Open
the GL Accounts folder.
5 Click
Consignment Inventory.
6 Set
up the GL Account rules as needed for your business.
7 Click
Accept.
Back to System Configuration.
Back to Top. |
|
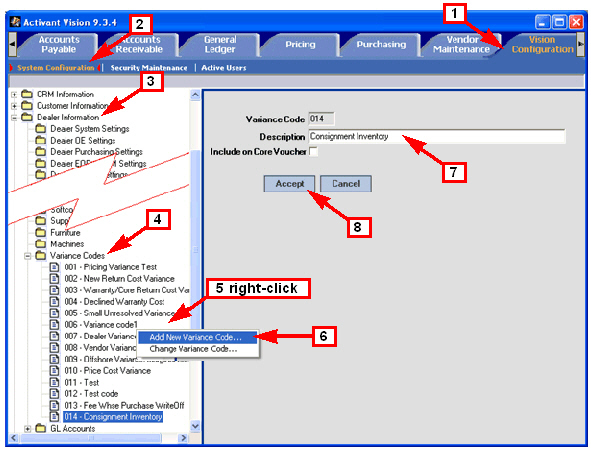
Set Up a Consignment
Variance Code
1 Click
Vision Configuration.
2 Click
System Configuration.
3 Open
the Dealer Information folder.
4 Open
the Variance Codes folder.
Note: If
you find that the Consignment Inventory variance code already
exists, you can skip the rest of this procedure. Otherwise, continue.
5 Right-click
anywhere in the tree list of variance codes.
6 Select
Add New Variance Code from the popup menu.
7 Type
the description as “Consignment Inventory.”
8 Click
Accept.
Back to System Configuration.
Back to Top.
|
|
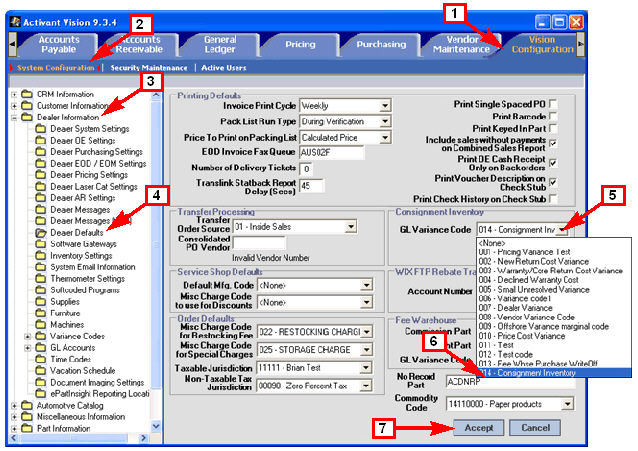
Set the Dealer
Consignment Inventory Variance Code
1 Click
Vision Configuration.
2 Click
System Configuration.
3 Open
the Dealer Information folder.
4 Open
the Dealer Defaults folder.
5 Click
the down-arrow for the list of GL Variance Codes.
6 Select
Consignment Inventory from the drop-down list.
7 Click
Accept.
Back to System Configuration.
Back to Top. |
|
Customer Configuration
Follow these procedures to configure a customer
to receive consignment inventory through a consignment vendor.
Procedure |
Comments |
Create a Consignment Vendor |
A consignment vendor is a fictitious
vendor you use for shipping and tracking inventory on consignment
with a specific customer. |
Assign the Consignment Vendor to the Customer |
The consignment vendor must be
associated with only one customer. In fact, the system displays
an error if you try to assign a consignment vendor to more than
one customer or customer ship-to. |
Back to Top.
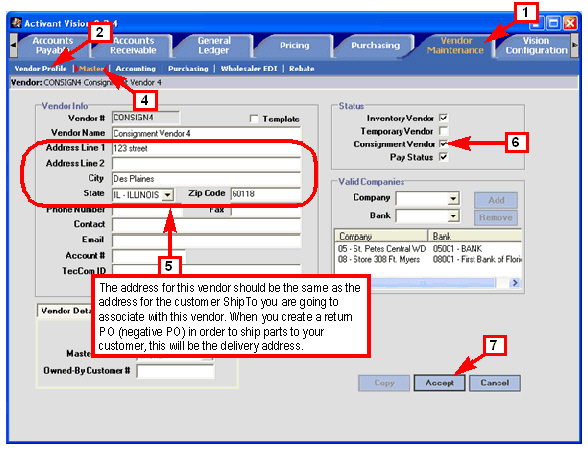
Create a Consignment
Vendor
A consignment vendor
is a fictitious vendor you use for shipping and tracking inventory
on consignment with a specific customer.
1 Click
Vendor Maintenance.
2 Click
Vendor Profile.
3 Create
a new vendor. (Not shown at right.)
See Create a Vendor from Scratch in
the online help for detailed instructions.
4 Click
Master.
5 Input
the same address for this vendor as for the customer ShipTo you
want to use.
Note: You
will later associate this vendor with a single customer ShipTo.
The address for this vendor should be the same as that ShipTo.
This will be the delivery address for parts shipped to the customer
via a return purchase order.
This vendor will be used only for handling consignment inventory
for that specific customer. You should give this vendor a name
that makes it easy to remember which customer it is used for.
6 Set
the vendor’s status to Consignment Vendor.
Note: You
must put a check mark in this box in order for the vendor to show
up in the Consignment Vendor list on the Customer Maintenance
—> ShipTo Preferences screen.
7 Click
Accept.
Back to Customer
Configuration.
Back to Top. |
Note: This
vendor should only be used for consignment inventory. Writing
a purchase order for a consignment vendor reduces consignment
inventory and creates a voucher at End of Day. |
Assign the Consignment
Vendor to the Customer
1 Click
Customer Maintenance.
2 Select
a customer. (Not shown at right.)
See Select a Customer in the online
help for detailed instructions.
3 Click
ShipTo Main.
4 Select
a ship to location from the list view.
(Not shown at right.)
This is the ship to you want to associate with the consignment
vendor you created earlier.
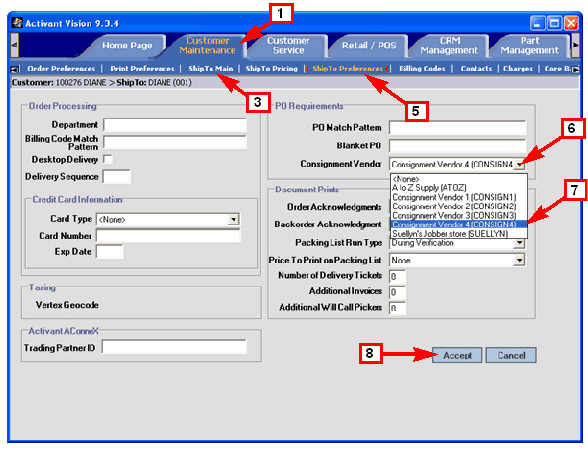
5 Click
ShipTo Preferences.
6 Open
the Consignment Vendor drop-down list.
7 Select
the consignment vendor to associate with this ShipTo location.
8 Click
Accept.
Note: Trying
to assign a consignment vendor to more than one ship-to produces
an error.
Back to Customer Configuration.
Back to Top.
|
|
Consignment/Dealer
Inventory Inquiry and Maintenance
• Consignment/Dealer
Inv
• Consignment/Dealer
Inv Search Filters
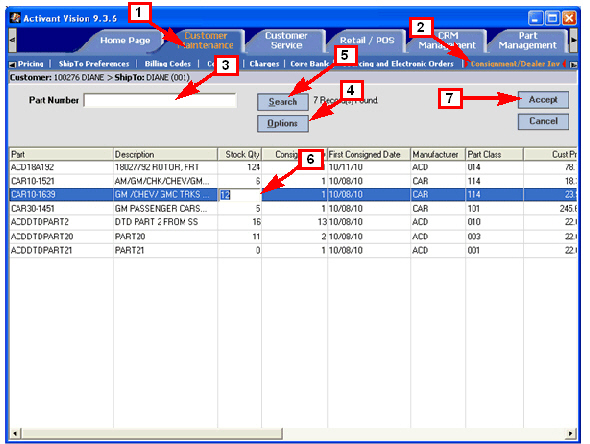
Consignment/Dealer
Inv
1 Click
Customer Maintenance.
2 Click
Consignment/Dealer Inv.
3 Type
in a part number, or leave it blank.
4 Optionally,
click Options and enter search filters. (See Consignment/Dealer Inv Search Filters for details.)
5 Click
Search.
6 Make
changes to the Stock Qty amounts, if necessary.
This value is used as a guideline
(or target) for how many units of a particular part you want to
keep on consignment.
7 Click
Accept to save your changes.
Back to Top.
|
|
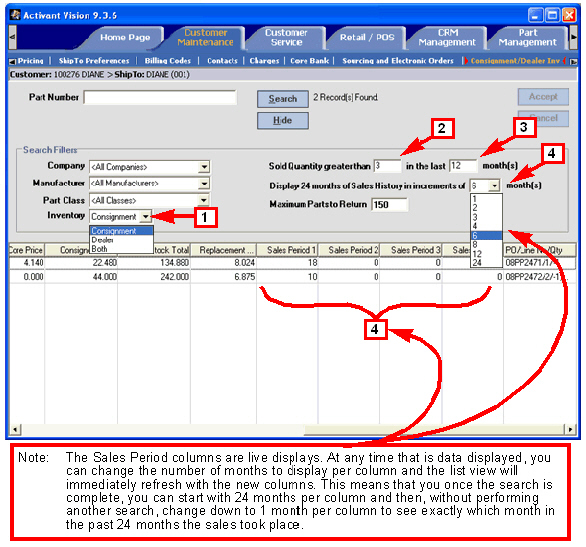
Consignment/Dealer
Inv Search Filters
In addition to
the usual filters of Company, Manufacturer, Part Class, and the
maximum number of parts to return, you can restrict your results
by the following filters:
1 Inventory
types:
• Consignment.
• Dealer.
• Both.
2 Quantity
sold.
1 to 99999.
3 Number
of Months to search for conforming sales quantity.
1 to 24.
4 Size
of Sales History increments to display.
1 / 2 / 3 / 4 / 6 / 8 / 12 / 24.
The system always displays
a total of 24 months of sales history. The number of columns the
system displays is 24 divided by the number of months in the increment.
For example, the display shown at right has four columns (24/6
= 4).
For an increment of 1, the
system displays 24 columns; for an increment of 8 there will be
three columns; for an increment of 24, there will be only one
column.
Note: The
lowest numbered sales periods always contain the most recent sales
months. For example, if the increments for sales history is set
to 24, then
• Sales
Period 1 = current sales month.
• Sales
Period 2 = previous sales month.
• Sales
Period 3 = sales three months ago.
Back to Consignment/Dealer Inventory Inquiry and Maintenance.
Back to Top. |
|
Starting the Consignment
Process
To begin sending your customers consignment parts,
do the following:
1. Create
a consignment vendor for your customer.
(See Create a Consignment
Vendor for details.)
2. Assign
the consignment vendor to your customer’s ShipTo.
(See Assign the
Consignment Vendor to the Customer for details.)
3. Create
a negative purchase order by selecting Return as the purchase order type.
Purchasing —> Current PO.
4. Receive
the purchase order.
When you receive the purchase order, the
system updates the following data visible on the Customer Maintenance —> Consignment/Dealer Inv
screen:
• Consigned Qty
• First Consigned
Date
• Consignment PO
• Consignment PO
QTY
5. During
EOD, voucher the purchase orders with zero dollars. The system uses the
Purchasing Returns and Consignment Inventory GL accounts for the distribution.
Note: If you need to
increase the consignment quantity, or you need to add different parts
to your customer’s consignment stock, you will need to create a new negative
purchase order.
Back to Top.
Tracking Inventory
and Charging for Parts Sold
This section covers consignment inventory counts,
using orders to charge the customer for parts sold, and using reports
to track consignment inventory.
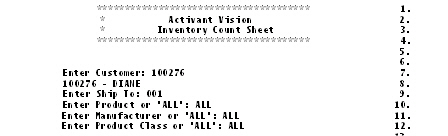
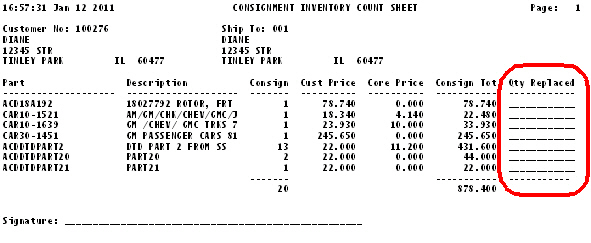
1 Print
an Inventory Count Sheet for the customer ShipTo.
Auto Menu 3.9.2, Inventory
Count Sheet.
OP Menu 8.9.2, Count Sheet.
The Inventory Count Sheet
asks for customer, ship-to, product, manufacturer, and product
class.
The printout looks similar
to the example below right. |
|
2 Replenish
the consignment stock.
When you replenish the consignment
stock, note the quantity replaced on the consignment inventory
count sheet in the area circled in red shown at right.
Note: Do
not create another negative purchase order to replenish an established
consignment stocking level. Only create a negative purchase order
when increasing the consignment stocking level or when adding
new parts to consignment.
|
|
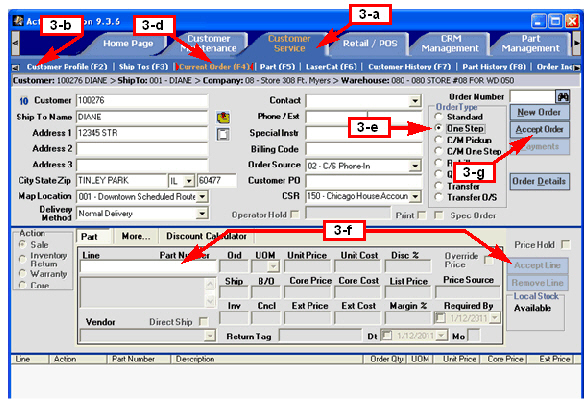
3 Create
an order for the consignment inventory sold at the customer’s
site, based on the inventory count results.
a Click
Customer Service.
b Click
Customer Profile.
c Select
the desired customer.
(Not shown at right.)
d Click
Current Order.
e Set
the Order Type to One Step.
One Step orders relieves inventory but does not print a pick ticket.
f Enter
the parts, accepting each line.
g Click
Accept.
The order will charge the customer
for the parts sold.
|
|
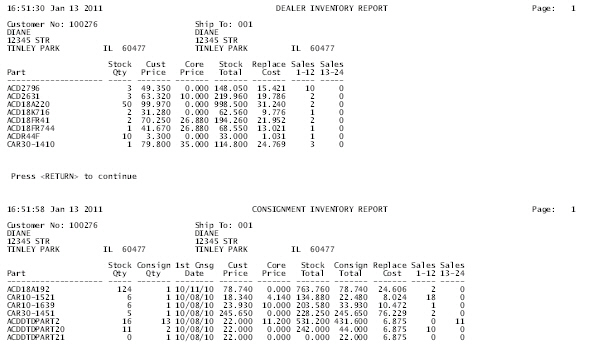
4 Generate
a the Consignment/Dealer Inventory report.
Auto Menu 3.9.1, Inventory
Report.
OP Menu 8.9.1, Inventory
Report.
The report prompts are shown
at right.
An example of the report
sent to the screen is shown below right.
|
|
Dealer and Consignment
Inventory Reports are both generated. They should look similar
to the example at right.
Back to Top. |
|
Ending the Consignment
Process
To end consignment with a customer, do the following:
1. Perform
an inventory count and remove any parts remaining at the at the customer’s
ship-to.
2. Create
an order to charge the customer for any parts they sold.
3. Create
one or more purchase orders for the consignment vendor.
These purchase orders should reverse all
negative purchase orders created during the consignment.
4. During
EOD, voucher the purchase orders with zero dollars. The system uses the
Purchasing Returns and Consignment Inventory GL accounts for the distribution.
Back to Top.
Part (F5) Screen
Customer Service
—> Part (F5)
Retail / POS —> Part (F5)
On the Part (F5) screen, if you
have a Customer and a ShipTo defined and that ShipTo is associated
with a consignment vendor, when you look up a part that is on
consignment, you can look at the Part Info subtab to see how many
units of that part the customer is stocking on consignment.
Back to Top. |
|