GUI General Ledger Journal Entry
Back to GUI General Ledger Journal Entry (feature table).
Back to Enhancement Details (feature list).
Vision GUI Path |
|
|
Related Vision GUI Path |
||||
|
|
General Ledger
|
—>Journal Entry —>Journal Entry Posting |
|
|
|
Vision Configuration —> Security Maintenance —> User Maintenance —> [Selected User] > Roles |
Overview
As of release 10.0, Vision provides two GUI screens that let you enter and post general ledger journal entries. (See Vision GUI Path above.) In previous releases, you could make journal entries only through the Vision Back Office. Between these two new screens, you can do what you previously accomplished using the Vision Back Office menus (Auto 14.3.1 and OP 14.1). The Journal Entry screen lets you create journal entry batches. Three option buttons let you choose between Regular, Auto-Reverse, or Recurring journal entries. The Journal Entry Posting screen lets you view, edit, and post the batches you create. Note: Once you have posted a batch, you can no longer view it or edit it. Note: In order to use the new screens, you must have the GENERAL LEDGER job function in one of your roles. The following standard roles have the GENERAL LEDGER job function built in. • Accounting Manager • Accounts Payable Clerk • Accounts Payable Manager • Accounts Receivable Click this link for instructions on Assigning Roles to Users. |
When you post a batch from the Journal Entry Posting screen, the system automatically generates a report and sends it to the spooler. If there are posting errors, the system generates the following CRM event: • JEPostError — Journal Entry Post errors exist Note: The Vision Back Office journal entry posting does not generate a CRM event. When you use the Vision Back Office to create and post journal entry batches, you must manually check for errors by examining the generated report. But when you use the Vision GUI General Ledger Journal Entry and Journal Entry Posting screens to create and post journal entries, Vision checks for errors automatically and sends a CRM event when an error occurs. You can then look at the generated report for more detail.
These topics provide additional information: |
|
|
Journal Entry Posting — Post, View, Edit • Posting Regular and Auto-Reverse Batches |
|
|
Journal Entry — Create a New Batch
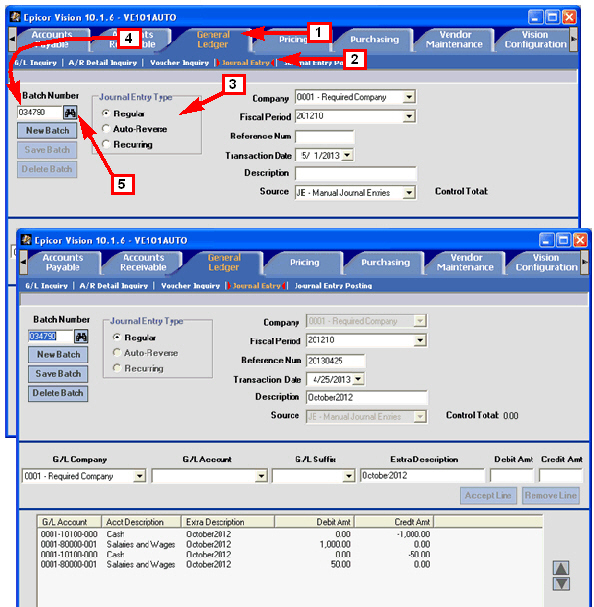
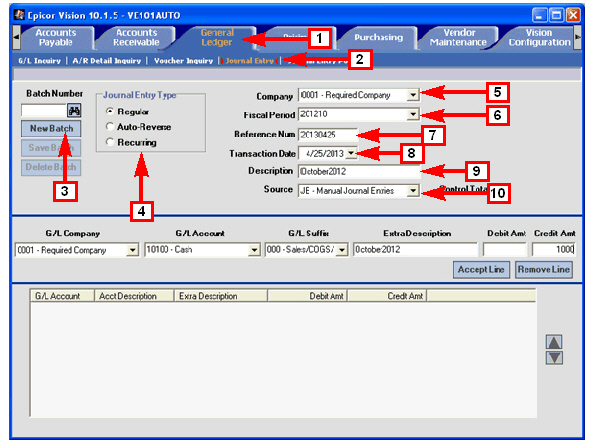
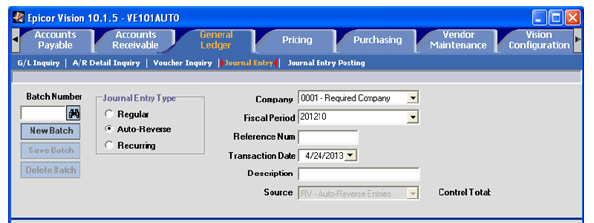
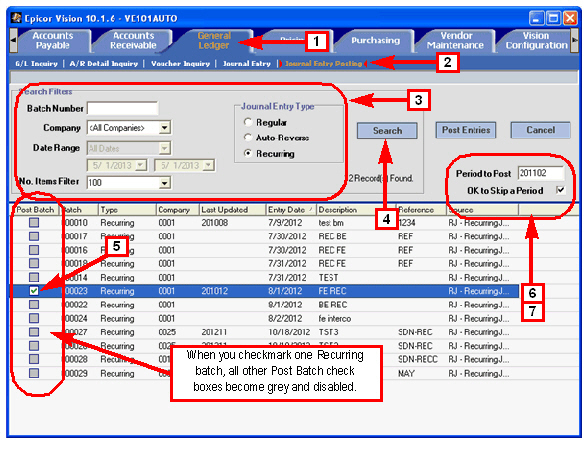
General Ledger —> Journal Entry Use this screen to do any of the following: • Create and save new batches • Edit and save existing batches • Delete existing batches To create a new batch do this: 1 Click General Ledger. 2 Click Journal Entry. 3 Click New Batch (if necessary to clear a previous edit session). 4 Select Journal Entry Type. • Regular • Auto-Reverse • Recurring Note: If you are using Great Plains accounting software, then this screen only allows entry of Regular journal entry types. Auto-Reverse and Recurring are disabled if Great Plains is enabled. 5 Select the Company. 6 Select the Fiscal Period. See Fiscal Period at right. 7 Enter the Reference Number, if any. 8 Select the Transaction Date. Note: If the Journal Entry Type is Recurring, Transaction Date changes to Entry Date. 9 Enter a Description. When you complete the Description and you move out of this field in the header, the system copies your entry to the Extra Description field in the line item editing fields. 10 Select the Source. The source for a Regular journal entry defaults to JE and can be changed; Auto-Reverse defaults to RV and is read-only; Recuring defaults to RJ and is read-only. For examples of the changes to the header fields for the other two entry types see Auto-Reverse and Recurring. |
![]()
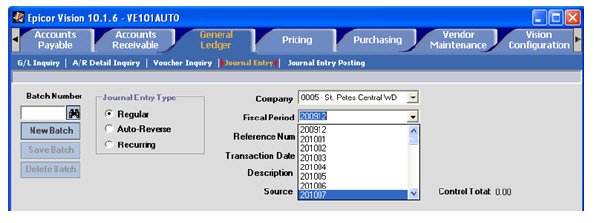
The Fiscal Period field defaults to the first fiscal period that has not been closed for the selected Company. The fiscal periods displayed in the drop-down list are all the open fiscal periods for the selected Company. The list always begins with the first fiscal period that has not been closed and ends with the final period of the current fiscal year. For example, in the screenshot above, the Fiscal Period is defaulted to 201210, or October 2012, and the drop-down list displays all fiscal periods from October 2012 through the end of the current fiscal year for the selected Company, or December 2013. Note: If the Journal Entry Type is Recurring, the Fiscal Period field changes to Last Period Updated and becomes read-only. On a new Recurring batch, the field is blank. After the batch has been posted once, the next time you bring up this batch, the field will display the last period in which the journal entry was updated. |
|
Back to Top |
|
|
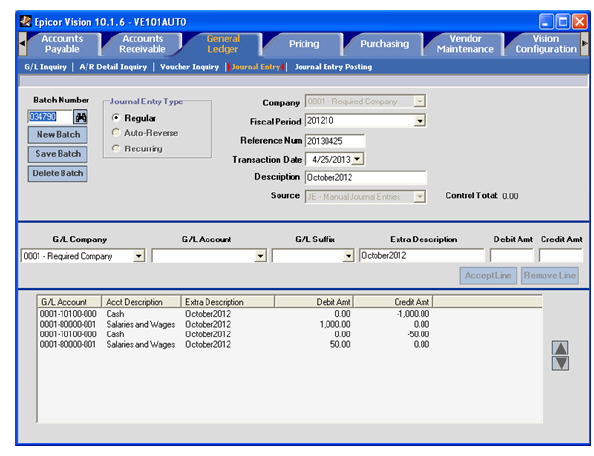
This field defaults to the value selected in the Company field in the header, but it can be changed. 12 Select the G/L Account. 13 Select the G/L Suffix. Note: If the G/L Account and G/L Suffix combination does not combine to make a valid G/L number, the system displays a validation error ( 14 Enter the Extra Description. (Optional.) This field defaults to the Description you entered in the header but you can change it. For example, you could add or change information to help explain how a line item is being used or what it represents. 15 Enter a Debit Amt or a Credit Amt. Note: Do not try to enter both. If you try to enter both debit and credit on a single line, the system disables the Accept Line button. Note: When a single line has been accepted, the Journal Entry Type, Company, and Source all become read-only and cannot be changed. However, if you use the Remove Line button and remove that line from the list view so that no line has been accepted, those fields become editable again. 17 Perform step 11 through step 16 for as many line items as needed and until the Control Total is zero. Note: Delete Batch is only available when an existing batch is on the screen. You can delete a batch regardless of its Control Total or whether a line item is in edit mode. Back to Journal Entry Back to Top |
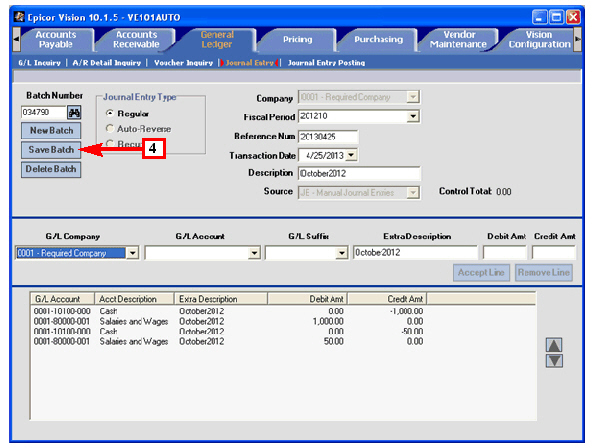
The image below depicts an existing batch being edited. ![]() |
|
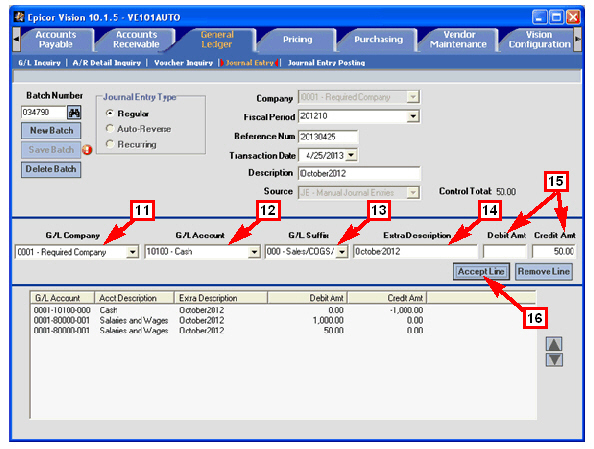
The combined G/L Account and G/L Suffix numbers are validated against the CA file for Vision GL. If you are using Great Plains, the numbers are validated against the Great Plains database. Control Total, located to the right of the Source field, is a running total of the debits and credits in the batch. The system does not enable the Save Batch button unless this running total is zero. At any time when the Control Total is non-zero, the Save Batch button is disabled. |
This field can be different from the Company field in the header. This allows you to make intercompany general ledger entries. However, before you can mix companies within general ledger entries, you must have a G/L Account rule set up for intercompany journal entries. GUI Journal Entry adheres to the same requirements as the Vision Back Office Journal Entry. If a selected G/L account has a G/L rule for posting to another company, then GUI Journal Entry uses that rule. |
|
18 Click Save Batch when you are done. Note: Control Total must be zero in order to save the batch.
Back to Journal Entry Back to Top |
This image depicts a new batch ready to be saved. ![]() |
|
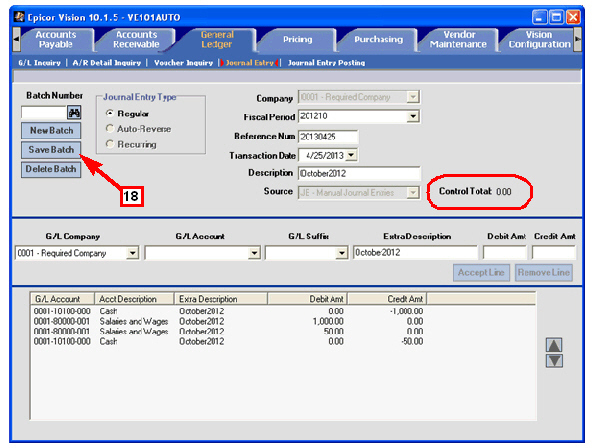
Note: Source is read-only
Back to Journal Entry Back to Top
|
![]()
|
|
Note: Fiscal Period is now Last Period Updated
Back to Journal Entry Back to Top |
![]()
|
|
Fiscal Period Example In this example, with the particular company selected, the available fiscal periods are as follows • 200912 • 201001–201012
The Vision system can have two fiscal years open. |
![]()
|
|
Rearranging Line Items in a Batch The arrows on the right side of the list view let you change the order of the line items in the batch. Reordering the lines has no effect on the Control Total. You can rearrange the lines at any time when editing an existing batch or creating a new batch.
1 Click on the line you want to move. 2 Click on the arrows to move the line up or down.
Back to Journal Entry Back to Top |
This image depicts an existing batch being edited. ![]() |
|
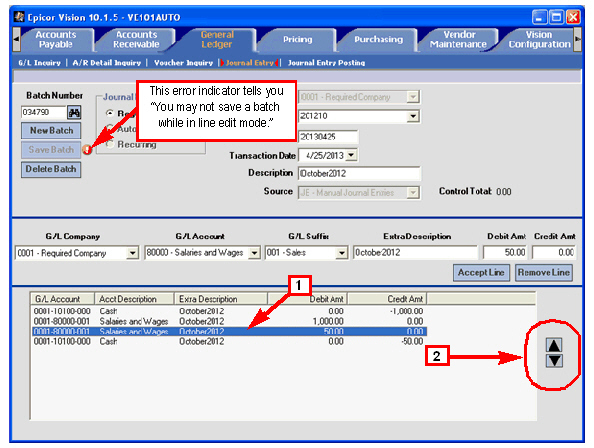
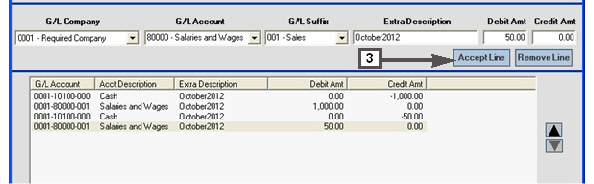
3 Click Accept Line when the line is where you want it. Note: The change in color of the highlight is not important.
Back to Journal Entry Back to Top |
![]()
|
|
4 Click Save Batch. The batch is saved with the new line item order.
Back to Journal Entry Back to Top |
![]()
|
Journal Entry Posting — Fields Defined
General Ledger —> Journal Entry Posting Use this screen to search for and post batches.
|
![]()
|
||
To find a batch or a group of batches use the Search Filter fields to narrow your search. Batch Number Leave this blank if you are looking for a group. Otherwise, type in the exact batch number. You must also select the correct Journal Entry Type. Note: If you enter a specific batch number but you do not select the correct Journal Entry Type, you will receive a No Data Selected message in the list view. Company The drop-down list lets you select a specific company or <All Companies>.
|
Date Range Lets you select from the following when the No.Items Filter is set to Max. • Previous Week • Previous Month • Previous 6 Months • Previous Year • All Dates • Custom Dates — Lets you select specific start and stop dates. No. Items Filter Lets you select from the following number of batches to return. If you select Max, then the system enables the Date Range filter. • Max • 1 • 10 • 25 • 50 • 100 • 300 • 500 |
||
Journal Entry Type Select the type of batch your looking for. Because of the way batch numbers are assigned you must select the correct type for the target. |
View Batch Only enabled when a single item is selected. Opens a read-only dialog box that displays the line items within the batch. Note: Double-Click opens the same dialog. Edit Batch Only enabled when a single item is selected. Opens the batch on the Journal Entry screen.
|
Check Selected Items Uncheck Selected Items Only enabled when multiple items are selected. Places or removes a check mark in the box in the Post Batch column. Print Journal Entry Listing For the highlighted batches, this prints the same data as the View Batch option displays. These are the same as the Vision Back Office listing options. Please see Equivalent Vision Back Office Functions. Note: You cannot print the journal entry listing when EOD is running.
|
|
Use any combination of the following to select (highlight) batches. • Click on the first batch, then shift-click on a second batch to select a continuous group of batches. • Shift + up/down arrow keys to select a continuous group of batches. • Control-click to select non-contiguous batches. |
|||
Back to Top |
|
|
Journal Entry Posting — Post, View, Edit
Posting Regular and Auto-Reverse Batches
Editing an Existing Batch — Alternate Method
Posting Regular and Auto-Reverse Batches
To post either regular or auto-reverse batches, do the following:
1 Click General Ledger. 2 Click Journal Entry Posting. 3 Specify search criteria. 4 Click Search. 5 Select one or more batches. 6 Right-click one of the selected batches. 7 Choose Check Selected Items. 8 Click Post Entries. The Vision system immediately posts all batches that have a check mark in the Post Batch column. Note: If the Journal Entry Type is Recurring, the system behaves differently. It does not allow more than one recurring batch to have a check mark. Only one Recurring batch can be posted at a time. See Posting Recurring Batches. Note: If you click the Cancel button, the system removes the check marks on all listed batches. Back to Top |
![]()
|
To post recurring batches, do the following:
1 Click General Ledger. 2 Click Journal Entry Posting. 3 Specify search criteria. 4 Click Search. 5 Select only one batch for posting. Note: When a single batch is checked, all other batches are disabled. The system allows only one recurring batch at a time to be posted. 6 Enter a Period to Post. ![]() 7 If necessary, click OK to Skip a Period to set it. 8 Click Post Entries. Back to Journal Entry Posting — Post, View, Edit Back to Top |
![]()
Note: Recurring batches must be manually reposted in every period.
|
To view a batch, do the following:
1 Click General Ledger. 2 Click Journal Entry Posting. 3 Specify search criteria. 4 Click Search. 5 Use one of these two techniques: |
![]()
|
a Right-click on the batch you want to view. b Choose View Batch from the popup menu. Note: If there are multiple batches selected (highlighted), then you must first left-click to make sure only one batch is selected. |
|
OR |
|
1 Double left-click on the batch you want to view. |
|
The Vision system displays the batch in a read-only popup dialog box as shown below right. Note: You can view only batches that have not been posted. |
|
Journal Entry View Batch Dialog
Back to Journal Entry Posting — Post, View, Edit Back to Top |
![]()
|
To edit an existing batch, do the following: 1 Click General Ledger. 2 Click Journal Entry Posting. 3 Specify search criteria. 4 Click Search. 5 Right-click on the batch you want to edit. Note: If there are multiple batches selected (highlighted), then you must first left-click to make sure only one batch is selected. 6 Choose Edit Batch from the popup menu. The Vision system switches to the Journal Entry screen and opens the requested batch as shown below right.
Note: You can edit only batches that have not been posted.
Back to Journal Entry Posting — Post, View, Edit Back to Top |
![]()
|
Existing Batch Ready for Editing
Back to Journal Entry Posting — Post, View, Edit Back to Top |
![]()
|
Editing an Existing Batch — Alternate Method
If you know the number of the batch you want to edit you can use this alternative method to bring up the batch in edit mode. 1 Click General Ledger. 2 Click Journal Entry. 3 Specify the Journal Entry Type. 4 Type the batch number, including any leading zeros. 5 Click the Find The Vision system populates the Journal Entry screen with the batch ready to edit as shown below right. Note: If you do not specify the correct Journal Entry Type, the system displays a Batch Search Error with message
Note: You can edit only batches that have not been posted.
Back to Journal Entry Posting — Post, View, Edit Back to Top |
![]()
|
Equivalent Vision Back Office Functions
This table lists those Vision Back Office functions that are covered by the General Ledger GUI Journal Entry and Journal Entry Posting screens discussed in this topic.
Accounts Payable Vision Back Office Functions |
|||
|
AUTO |
14.3.1.1 14.3.1.2 14.3.1.3 14.3.1.5 14.3.1.6 14.3.1.7 14.3.1.8 14.3.1.9 14.3.1.10 |
Journal Entries Auto-Reverse Journal Entries Recurring Journal Entries Journal Entry Posting Auto-Reverse Journal Entry Posting Recurring Journal Entry Posting Journal Entry Listing Auto-Reverse Journal Entry Listing Recurring Journal Entry Listing |
|
OP |
14.1.1 14.1.2 14.1.3 14.1.5 14.1.6 14.1.7 14.1.11 14.1.12 14.1.13 |
Journal Entries Auto-Reverse Journal Entries Recurring Journal Entries Journal Entry Posting Auto-Reverse Journal Entry Posting Recurring Journal Entry Posting Journal Entries List Auto-Reverse Journal Entries List Recurring Journal Entries List |
Back to Top