The Vision system lets you create price rounding models that the system can apply after all other price calculations are complete. You can create multiple rounding models, giving you greater control over your pricing.
The price-rounding feature lets you
Round the final calculated price according to a rounding model.
Apply rounding models to individual price rules within existing price models.
Enable or disable rounding on individual price levels within a price model.
Create new rounding models.
Modify existing rounding models.
Rounding models do not affect any pricing calculations that occur within customer maintenance.
Price Rounding does not affect or override any of the three different types of contract pricing: Fixed, Flexible, or Sale.
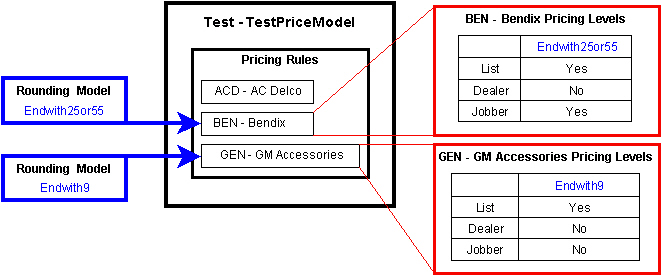
Rounding models work in association with pricing rules within pricing models. Within a pricing model you can associate a rounding model with a pricing rule. Then, within the pricing rule you can choose whether or not to apply the associated rounding model to any price level in that rule. Only one rounding model at a time can apply to a pricing rule.
For example, in the following diagram, rounding model Endwith25or55 is associated with the pricing rule for BEN-Bendix and it is applied to the List and Jobber price levels. Rounding model Endwith9 is associated with the pricing rule for GEN-GM Accessories and it is applied to only the List pricing level.

To implement rounding models on your Vision system, you must:
Create one or more rounding models. (See immediately below.)
Apply a rounding model to a pricing rule within an existing pricing model.
To create a rounding model, follow these instructions:
|
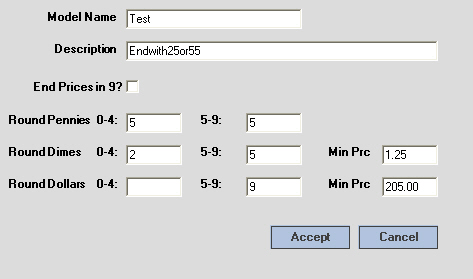
The Rounding Model form opens in the right-hand pane as shown below right. |
Click the image to see a larger view. |
|
Click a field to see an explanation.

These examples reflect the behavior of the settings shown in the image immediately above. These settings are not necessarily what you would want to have in your system. They serve only to demonstrate the flexibility of the feature.
|
Price |
Rounded Price |
|
0.32 |
0.25 |
|
0.67 |
0.55 |
|
1.11 |
1.15 |
|
1.33 |
1.25 |
|
45.69 |
45.55 |
|
251.47 |
251.25 |
|
256.63 |
259.55 |
back to implementing rounding models
|
Click the image to see a larger view. |
|
Click the image to see a larger view. |
|
Click the image to see a larger view. |
back to implementing rounding models
After you have created rounding models and you have applied the rounding models to your pricing models, you can recalculate your product and part prices so that they reflect the price rounding you've specified.
Any activity that triggers a pricing calculation based on a model, automatically applies the rounding models that are specified in the applicable pricing model. For example, the EOD process and any price level changes in the Part Management -> Costs/Prices screen or Pricing -> Pricing screen will automatically apply any associated rounding models.
To recalculate your prices using the rounding models you created and applied in the previous steps, use Vision Back Office menu 2.11.1, Pricing Calculation.
|
Click the image for a larger view. |
|
Click each image for a larger view. |
Type 1<Enter>. The system prompts you for an operator code and the effective date of the pricing calculation. |
Click the image to see a larger view. |
|
|
|
|
|