
Back to Cash Drawer Opening (feature table).
|
Vision GUI Path |
|
||
|
|
|
Home Page —> Home Page |
|
Vision can open a cash drawer when you either receive payments or give cash refunds. With appropriate hardware connections, Vision can open a cash drawer when you successfully complete any of the following screens or dialogs and money is either collected or refunded:
• Customer Service —> Current Order > Order Payment dialog
• Retail/POS —> Current Order > Order Payment dialog
• Customer Service —> Payments (F10)
• Retail/POS —> Payments (F10)
Note: Vision should open the cash drawer only if it accepts the transaction and no validation errors appear on the screen.
|
Links to Main Topics in this Discussion |
Cash drawers are connected to Vision through a connection port on a cash slip printer as illustrated below.
A cash drawer cannot connect directly to Vision. It must always be connected through a cash slip printer.
Vision always prints a cash slip receipt when receiving payments or paying out refunds.
You will need the following:
• A supported cash slip printer such as an Epson TN-J7100 or TM-T88IV, properly configured to open a cash drawer.
• A cash drawer supported by the cash slip printer.
• An appropriate interface cable to connect the cash slip printer to the cash drawer.
• An appropriate interface cable to connect the PC to the cash slip printer.
Note: For a list of supported cash drawers and cash slip printers, please contact your Activant sales representative.
Back to Top.
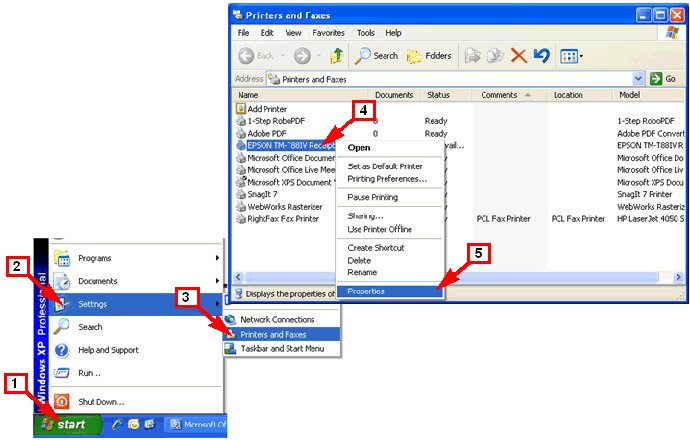
Once you install a cash slip printer on your system, you must configure it to open the cash drawer. The instructions below are for the Epson TM-T88IV receipt printer. Other receipt printers will be similar.
|
1 Click Start. 2 Open the Settings menu. 3 Click Printers and Faxes. 4 Right-click the receipt printer. For example, 5 Click Properties in the popup menu. |
|
|
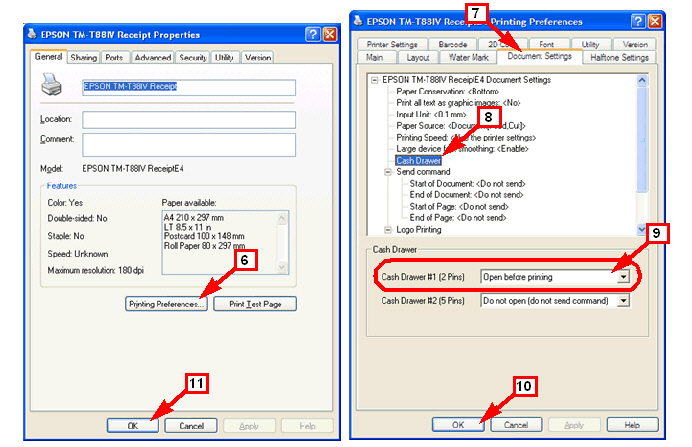
6 Click Printing Preferences 7 Click Document Settings 8 Click Cash Drawer 9 For Cash Drawer #1, Select Open before printing 10 Click OK. 11 Click OK.
|
|
Back to Top.
Configuring Vision For a Cash Slip Printer
|
1 Click Home Page. 2 Click Home Page. 3 Right-click the white Activant logo. 4 Select Choose Printers from the popup menu. 5 Select your Cash Slip printer from the drop-down list. 6 Select your ROA Receipts printer from the drop-down list. Note: In both step 5 and step 6, make certain to select the cash slip printer that is connected to your cash drawer. If you do not, your cash drawer will not open. Note: ROA stands for Received on Account.
|
|
Back to Top.