Delivery Driver Charges
Back to Dispatch Delivery System Driver Charges (feature table).
|
Vision GUI Path
|
|
If you use contract delivery drivers, Vision now provides a way to manage and track delivery charges and expenses.
You create non-inventory vendors to represent the contract delivery drivers. In the set up for each vendor, you can enter point rates, fuel rates, and tax rates. Then you set up your customer ship-to locations with base points and points for each associated warehouse.
Then when you need to, you can run two new reports that provide a breakdown of delivery charges by driver and delivery charge expenses by customer.
Note: To use the feature described in this section, your system must be licensed and configured for the Dispatch Delivery System.
|
|
|
Vision Configuration —> System Configuration
—> Dealer Information —> Software Gateways
> Dispatch Delivery Gateway
Vision Configuration —> System Configuration
—> Customer Information —> Map Location
—> [selected map location] : Use Dispatch Delivery System
Vendor Maintenance —> Accounting > Delivery
Customer Maintenance —> Ship To Main > Shipping > Delivery
|
|
|
Vision Back Office Menu
|
|
|
|
Auto Menu
|
14.4.17.1
|
Delivery Charges Report by Driver
|
|
|
|
|
14.4.17.2
|
Delivery Expense Report by Customer
|
|
|
|
OP Menu
|
3.18.1
|
Delivery Charges Report by Driver
|
|
|
|
|
3.18.2
|
Delivery Expense Report by Customer
|
|
How It Works
The following is a general description of how this feature operates.
Configuration Overview:
• Configure for Using the Dispatch Delivery System:
• Configure the Dispatch Delivery Gateway to communicate with Vision.
• Configure Vision to communicate with the Dispatch Delivery Gateway.
• Configure Map Locations to use the Dispatch Delivery System.
• Create Drivers as Non-Inventory Vendors:
• Create drivers as non-inventory vendors.
• Set up weekday and weekend point and fuel rates for each driver.
• Set up a delivery tax rate for each driver.
• Setup Customers’ ShipTo Delivery Information:
• Set up default delivery points for a customer’s ship-to location.
• Set up override delivery points by warehouse. The list of available warehouses for delivery point overrides includes warehouses of Inventory Class “Sellable Inventory.”
General Process Overview:
5. When you create a sales order for a customer ship to location that is set up with delivery points, Vision calculates the delivery charges based on those points. As is normal, when lines on the sales order are ready for picking, Vision creates a release.
6. When Vision creates a release for a sales order, Vision sends it to the Activant Dispatch Delivery System (DDS). DDS assigns a driver and displays the point value for the release. You can then override the point value on the DDS system if desired. Then DDS sends the driver and point value back to Vision. Vision updates the release with the information received from DDS and the release process continues as normal.
7. At any time, you can run the Delivery Charges by Driver report or the Delivery Expense by Customer report for a date range.
Refer to Vision Back Office Menu for the menu paths for running these reports.
Back to Top.
Configure for Using the Dispatch Delivery System
To set your system up for using the delivery charges feature, you need to do the following:
• Configure the DDS Gateway Server
• Configure the DDS Gateway in Vision
• Configure Map Locations to Use DDS
|
Configure the DDS Gateway Server
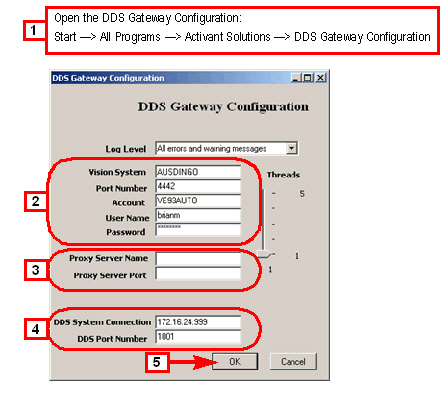
At right is the DDS Gateway Configuration dialog box.
1 Open the DDS Gateway Configuration dialog box as follows:
a Click Start.
b Click All Programs.
c Click Activant Solutions.
d Click DDS Gateway Configuration.
2 Fill in the values needed to communicate with the Vision application server.
3 If you are using a proxy server, fill in the name and port information here.
If you are not using a proxy server, skip this step.
4 Fill in the IP address and port on which the DDS system should listen for DDS requests from Vision.
5 Click OK.
Back to Top.
|
L
Note: The values in the fields above are for demonstration purposes only.
Contact Activant Customer Service if you need help with any of the settings for this dialog box.
|
|
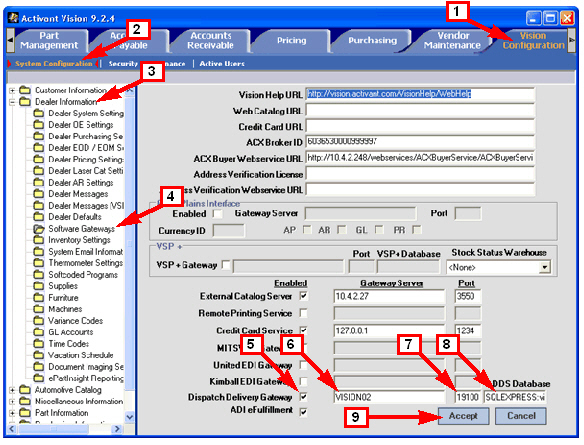
Configure the DDS Gateway in Vision
1 Click Vision Configuration.
2 Click System Configuration.
3 Click Dealer Information.
4 Click Software Gateways.
5 Set the Dispatch Delivery Gateway check box. (Put a check in the box.)
6 Enter the gateway server name or IP address.
7 Enter the port number for the server.
8 Enter the name of the DDS database.
9 Click Accept.
Back to Top.
|
|
|
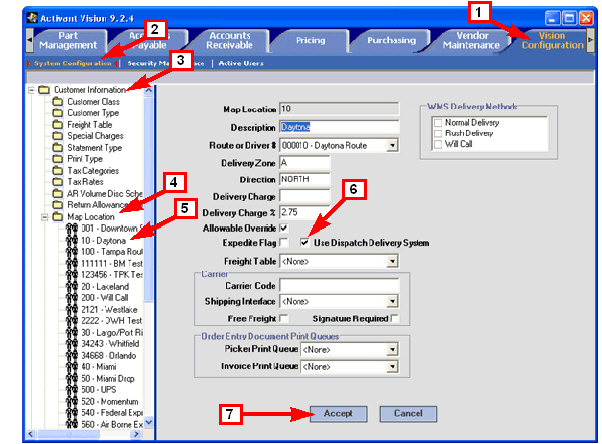
Configure Map Locations to Use DDS
Delivery Points work only for map locations that are set to use the Dispatch Delivery System.
Follow this procedure to set this option for the map locations you plan to use:
1 Click Vision Configuration.
2 Click System Configuration.
3 Open the Customer Information folder.
4 Open the Map Location folder.
5 Open a map location.
For example, 10 - Daytona.
6 Set Use Dispatch Delivery System.
(Put a check mark in the box.)
7 Click Accept.
Back to Top.
|
|
Create Drivers as Non-Inventory Vendors
|
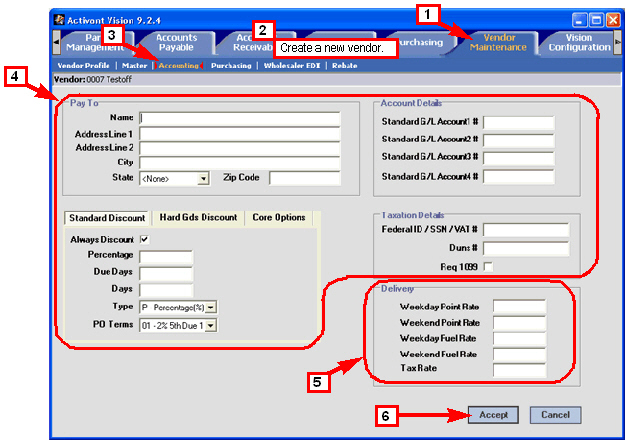
1 Click Vendor Maintenance.
2 Create a new non-inventory vendor.
See Vendor Maintenance Tab in the online help for detailed information on creating vendors.
Note: See the note below the screenshot at right for important information on creating drivers.
3 Click Accounting.
(Make certain the new vendor you created is still selected in the Vendor Profile screen.)
4 Fill in the information necessary for paying this vendor.
5 Fill in the delivery information fields.
• Weekday Point Rate.
0.00 to 999.99 [999999.00]
• Weekend Point Rate.
0.00 to 999.99 [999999.00]
• Weekday Fuel Rate.
0.00 to 999.99 [999999.00]
• Weekend Fuel Rate.
0.00 to 999.99 [999999.00]
• Tax Rate.
0.000 to 99.99
[0.001 to 99.899]
6 Click Accept.
Back to Top.
|
Note: When you create a non-inventory vendor to represent a driver, ensure that you do the following:
• Make sure that the Vendor Maintenance —> Master > Vendor Info : Vendor # contains the same value as the driver’s asset number in the Delivery Dispatch System.
• Make sure that the Vendor Maintenance —> Master > Status : Inventory Vendor check box is clear (not checked).
|
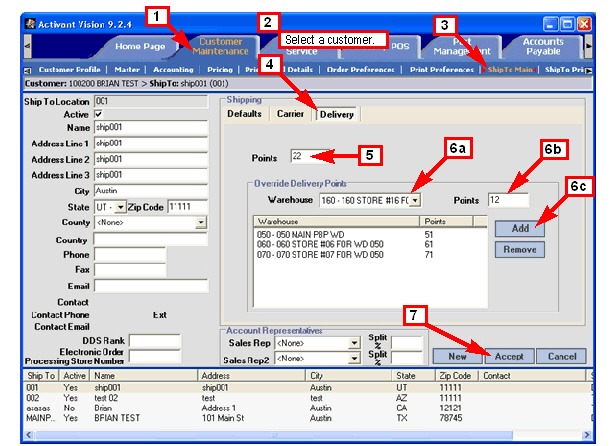
Setup Customers’ ShipTo Delivery Information
|
1 Click Customer Maintenance.
2 Select a Customer.
Click on the link to see detailed instructions in the online help.
3 Click ShipTo Main.
4 Click the Delivery sub-tab.
5 Input the default delivery points for this customer.
0 to 99999.
6 Input any delivery points warehouse overrides for this customer.
a Select a warehouse from the drop-down list.
b Input the override points.
0 to 99999.
c Click Add.
7 Click Accept.
Note: Customer map locations are under the Defaults sub-tab in the Shipping group box.
Back to Top.
|
|
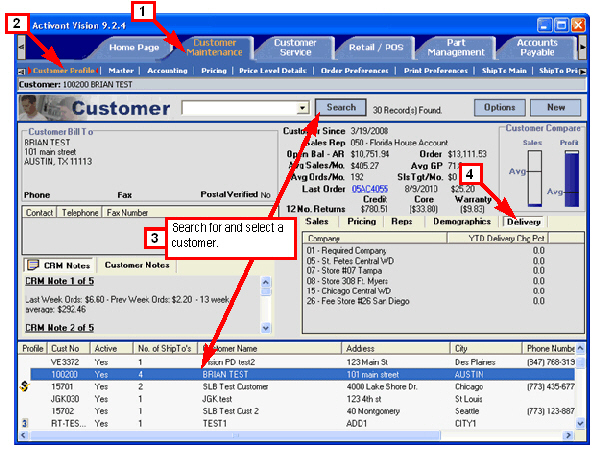
View Customer Year to Date Delivery Charges as a Percentage
|
1 Click Customer Maintenance.
2 Click Customer Profile.
3 Search for and select a customer.
Click on this link
Select a Customer
to see detailed instructions in the online help.
4 Click the Delivery sub-tab.
Back to Top.
|
|